Data Processing System (DPS) Tutorial A to Z
Authors: Sujen Shah and Rob Tapella
Review and Editing: Chuck Daniels and Rajat Shinde
Date: April, 2024
Description: This DPS tutorial is intended to demonstrate the steps needed to create, register, run, monitor and view outputs of algorithm jobs run at scale. It includes a template repository with various files needed to set up and run a job.
Importing and Installing Packages
Additional package installation will be included inline, and environment-configuration to support a custom conda environment in DPS is a part of the tutorial below.
Before Starting
This tutorial assumes that you have at least run through the Getting Started Guide and have set up your MAAP account.
This tutorial is made for the Application Development Environment (ADE) “Python (default)” workspace v4.0.0 or later (July 2024 or later).
This also assumes that you are familiar with using Github with MAAP.
An Overview of How DPS Works
The MAAP DPS (Data Processing System) lets you run an Algorithm at scale, in the cloud. It is different from running a Jupyter notebook in that it is non-interactive. Therefore, when migrating a notebook to the DPS it needs to be altered to take all of the input parameters at once as a command-line program. Even if you start with a command-line script, there are best practices to follow when preparing it for the DPS. Once that is done, the Algorithm can be Registered in a way that allows you to execute analysis jobs using a web-based form, where each field is defined during the Registration process.
The DPS will then be able to take a set of inputs and process them at scale. You do not need to worry about scheduling or scaling your jobs. You can also run your DPS Algorithm using the maap.py Python library in a loop to execute a batch of jobs (e.g., 1000 input files and one job per input-file). The DPS will manage the compute resources to handle your request, and you can easily find all of your outputs as each individual job completes.
Overview of this Tutorial
Run and Monitor an example Algorithm using the Jobs UI to help anticipate what we will accomplish
Clone the demo Algorithm
Edit and test your Algorithm code to make sure that it is working in its original form
Prepare the Algorithm for DPS by setting up the runtime arguments and pre-run environment set-up
Register the Algorithm with the Register Algorithm UI (or with maap.py)
Run and Monitor the Algorithm using the Jobs UI (or with maap.py)
View the outputs and errors from your run
This graphical overview may also help orient to the general flow: 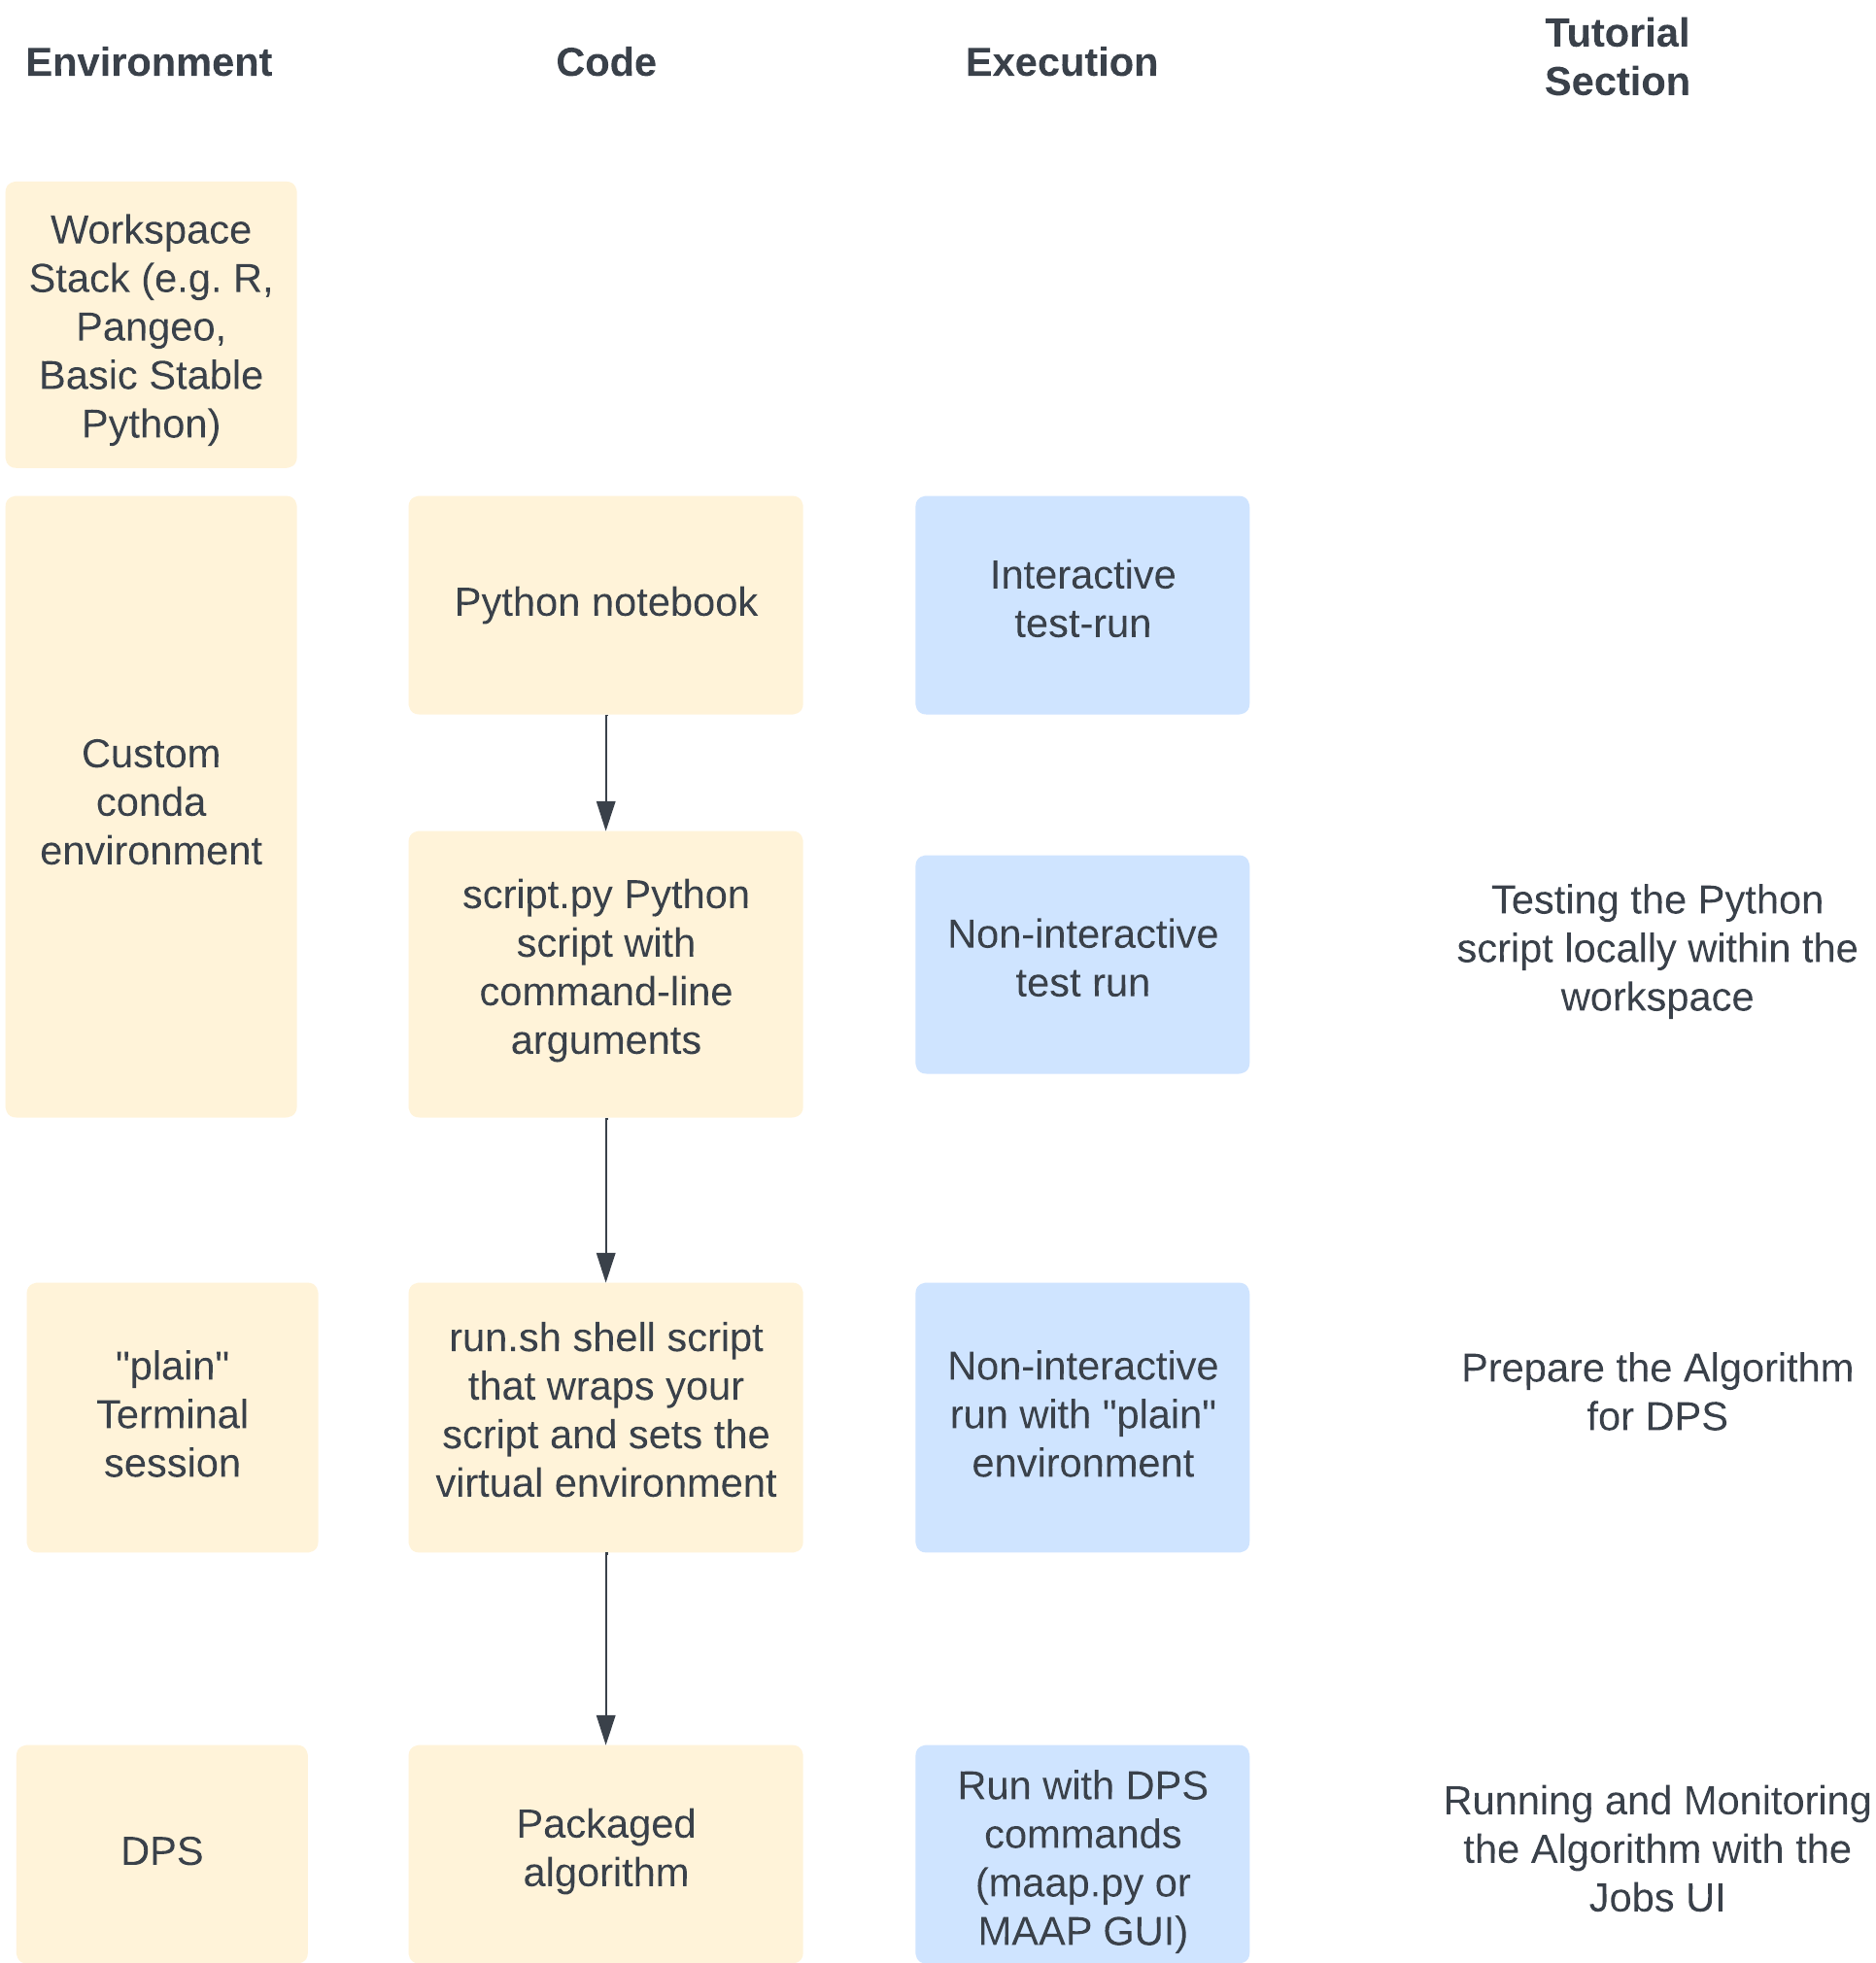
Run and Monitor an example Algorithm
If you are not familiar with running jobs in the DPS, please try running through the Jobs UI guide and the Getting Started Guide.
By familiarizing yourself with the process of running a Job, the Registration process may become more intuitive.
Context within a Typical Workflow
In most cases, before deciding to run an analysis at scale in the DPS, scientists will have a Jupyter notebook that has been developed to analyze data in an interactive fashion. Once the basic template of an analysis process has been tested in the Jupyter notebook format, the code needs to be formatted in a way to run in the DPS.
This tutorial uses a demo algorithm that is represented as a Python script. It is already formatted in a way that makes it easy to register as a DPS algorithm.
When you are migrating a Jupyter notebook to run in the DPS, the first step will be to migrate the core analysis code into a script. Hopefully the tutorial will demonstrate some of the key features of a standalone script that make it easy to run in the DPS such as a way to manage command-line arguments all at once, and an encapsulation of any custom environment needs.
Clone the Demo Algorithm
We will use an example Python-based algorithm for this tutorial. First we need to get the demo code into a Jupyter workspace.
For this tutorial, please use a Python (default) workspace (v4.0.0 or later).
Clone the Github repository at https://github.com/MAAP-Project/dps_tutorial . For the sake of this tutorial, we will assume that the clone is placed into a folder called algorithms in our home folder (i.e., ~/algorithms).
mkdir ~/algorithms
cd ~/algorithms
git clone https://github.com/MAAP-Project/dps_tutorial.git
An algorithm needs to be in a public code-repository in order to register it with the DPS. For this tutorial we will use the gdal_wrapper algorithm folder inside the dps_tutorial repository code. Now that you have the demonstration code, take a look at the files that are there and then we will be ready to perform a few test-runs before Registering it.
Anatomy of the gdal_wrapper algorithm folder in the dps_tutorial repo:
README.mdto describe the algorithm in Githubbuild-env.sh: (Generically: the build script) is a shell script that is executed before the algorithm is run; it is used to set up any custom programming libraries used in the algorithm (i.e., a custom conda environment)environment.yml: a configuration file used by conda to add any custom libraries; this is used by your build script (build-env.sh)gdal_wrapper.py: a python script that contains the logic of the algorithmrun_gdal.sh: (Generically: the run script) a shell script that DPS will execute when a run is requested. It calls any relevant python files with the required inputs. The run script is necessary to run your build script (to set up the runtime environment) and to execute your underlying alogorithm script(s). This is where you need to handle the input-file management—-for example passing one file at a time or a set of files at once.

Edit and Test your Code
Once you have an algorithm such as the gdal_wrapper test it to make sure that it is running properly. If it runs properly in a Jupyter Terminal window, you are one step closer to registering and running your algorithm in the DPS.
Typically a Jupyter Notebook is run interactively. A DPS algorithm will take all inputs up-front, do the processing, and produce output files–it is non-interactive while it runs. The gdal_wrapper script is already set up like a DPS algorithm. Some aspects to note:
Python argparse: Using a library like argparse to accept input parameters helps to make the code more readable and easier to debug when working locally. It provides easy to write user-friendly command-line interface.
Logging: It is a good practice to write out a log file during the execution of your code making it easier to debug. When running on the DPS, any logs written to the
outputdirectory or written tostdoutorstderrwill automatically be preserved.
Testing the Python script locally within the workspace
Before registering your algorithm you can test it locally to catch common errors related to input parsing and storing output. To test your algorithm locally before registration follow the below steps:
Open a fresh Terminal window and go to the DPS Tutorial folder that you just cloned. The prompt should indicate that you are in the
pythonconda environment because that is the default in a Python (default) type of workspace.
cd ~/algorithms/dps_tutorial

Make sure that your runtime conda environment is set up. To do this, run
build-env.shin thegdal_wrapperfolder.
cd ~/algorithms
cd dps_tutorial/gdal_wrapper
./build-env.sh
Make a new temporary directory outside your current repository. This is where you will do a test-run of your algorithm with some inputs and outputs.
mkdir ~/algorithms/dps_test_run
cd ~/algorithms/dps_test_run
Create a directory called
inputand place any input files required by your algorithm. Here you will need to download any input files up-front, and then run your script. Also make anoutputfolder. When you have registered your algorithm and run it in DPS, the input file can be passed in as a runtime parameter and DPS will automatically download it as part of the run.
mkdir input
mkdir output
# ls -F
input/  output/
You will need a test GeoTIF file as input. If you do not have one, go to the folder where you’d like to download the example file (assuming you’re in the
dps_test_runfolder as above,cd input) and use the following aws command (NOTE: if this step fails, it is likely that you are either in a Python (default) workspace, or you do not have the python conda environment activated):
cd input
aws s3 cp s3://nasa-maap-data-store/file-staging/nasa-map/ESACCI_Biomass_L4_AGB_V4_100m_2020/S40E160_ESACCI-BIOMASS-L4-AGB-MERGED-100m-2020-fv4.0.tif .
Once the input directory is set up,
cd ..back to thedps_test_rundirectory and call your run script. This is the script you would like the DPS to run when your code is executing on the cloud. Note: This assumes you have already built the environment with required custom packages as mentioned in the build-env.sh of your algorithm. We did this above.
cd ~/algorithms/dps_test_run
python ../dps_tutorial/gdal_wrapper/gdal_wrapper.py --input_file input/S40E160_ESACCI-BIOMASS-L4-AGB-MERGED-100m-2020-fv4.0.tif --output_file output/TestFile-30.tif --outsize 30
Successful output of the script should look like this:
Installed GDAL Version: 3.6.1
b'Input file size is 2400, 3600\n0...10...20...30...40...50...60...70...80...90...100 - done.\n'
And if you look in your output folder, you will see your output file:
# ls output/
TestFile-30.tif
If all desired outputs are created, you are one step closer to successfully running your algorithm on the DPS. Your core application can be run at a command-line in a non-interactive mode.
The next step is to prepare the Algorithm to be run in DPS.
Prepare the Algorithm for DPS
Once your scripts are working locally, make sure that they will also work in DPS.
The gdal_wrapper files are already prepared for DPS. When running from DPS we will have the run_gdal.sh shell script do the execution, so we should test it first:
cd ~/algorithms/dps_test_run
../dps_tutorial/gdal_wrapper/run_gdal.sh output_from_shell.tif 25
This should write a similar message to STDOUT that you saw when executing gdal_wrapper.py above. You should see an output file that is slightly smaller than the original test run because we chose a smaller value for the outsize parameter.
The shell script is wrapping the Python script that we ran above. Note that there are different parameters—-in the shell script we read all the input files from input/ and write outputs into the output/ folder. If you read the shell script you will see how this is happening.
# ../dps_tutorial/gdal_wrapper/run_gdal.sh output_from_shell.tif 25
Installed GDAL Version: 3.7.0
b'Input file size is 11250, 11250\n0...10...20...30...40...50...60...70...80...90...100 - done.\n'

# ls -alF *
input:
total 7696
drwxr-xr-x 2 root root    6144 Feb 28 15:52 ./
drwxr-xr-x 4 root root    6144 Feb 28 15:52 ../
-rw-r--r-- 1 root root 7869236 Jun  7  2023 S40E160_ESACCI-BIOMASS-L4-AGB-MERGED-100m-2020-fv4.0.tif

output:
total 20488
drwxr-xr-x 2 root root     6144 Feb 28 15:54 ./
drwxr-xr-x 4 root root     6144 Feb 28 15:52 ../
-rw-r--r-- 1 root root 22804732 Feb 28 15:53 TestFile-30.tif
-rw-r--r-- 1 root root 15834792 Feb 28 15:54 output_from_shell.tif
Some important things to note
File: build-env.sh
this script is used for installing packages using pip or conda
can take conda environment definition from
environment.yamlwhen creating your own, include any package or library that is needed by your script–any package you
import(python) orlibrary(R); this will ensure that your algorithm will run with any worker
File: run_gdal.sh
run_gdal.shis a bash script to call thegdal_wrapper.pyalgorithm: make sure for DPS you have inputs and outputs in the right places. If you look atrun_gdal.shyou will see that it is reading all the files from theinput/folder and writing to theoutput/folder.activate the correct compute (Python/R/etc) environment for your code to run (from your
build-env.shscript)the best way to execute your algorithm with a custom environment is to use
conda run, as shown in this script (conda run --live-stream --name dps_tutorial python ${basedir}/gdal_wrapper.py --input_file ${INPUT_FILENAME} --output_file output/${OUTPUT_FILENAME} --outsize ${REDUCTION_SIZE})
Run your scripts as if DPS is executing them
activate the default conda environment, in this case
conda activate pythonrun
build-env.shto create your custom environmentrun
run_gdal.shto execute your algorithm using the custom environment
Output folder
The DPS treats a folder named output specially. Any files stored in this folder will be preserved and uploaded to S3 after the algorithm run is complete. The location of this output will depend on factors like algorithm name, time of run, tags, etc. This output folder can be viewed within your workspace under the my-private-bucket/dps_output directory.
The output directory is created relative to your script specified in run_command at the time of registration. So to access the directory, simply do something like this in your run script.
mkdir -p output
Stderr & Stdout
By default, anything written to the stderr and stdout pipes will be stored in files call _stderr and _stdout and placed in your output directory.
Logfiles
DPS does not automatically store any logfiles written by your algorithm, if you would like them to be preserved make sure to write them in the output directory.
Future topics
What happens with input and output in DPS
How does file management happen?
Relative paths vs. absolute for input/output
Mimic what’s happening on DPS (basedir)
This wrapper
run_gdal.shscript needs to manage the input files the way that your python script requires them (e.g. pass single file at a time vs. multiple files at once, etc.)
Register the Algorithm with DPS using the Register Algorithm UI
When you are registering your own algorithm, make sure that all your changes are commited and pushed into Github. The registration process will pull the code from Github as part of registration. In this case, we will simply use the existing demonstration repo.
Open up Launcher: Register Algorithm (the same as the Register Algorithm option from the Command Palette)
Fill in the fields as described below.
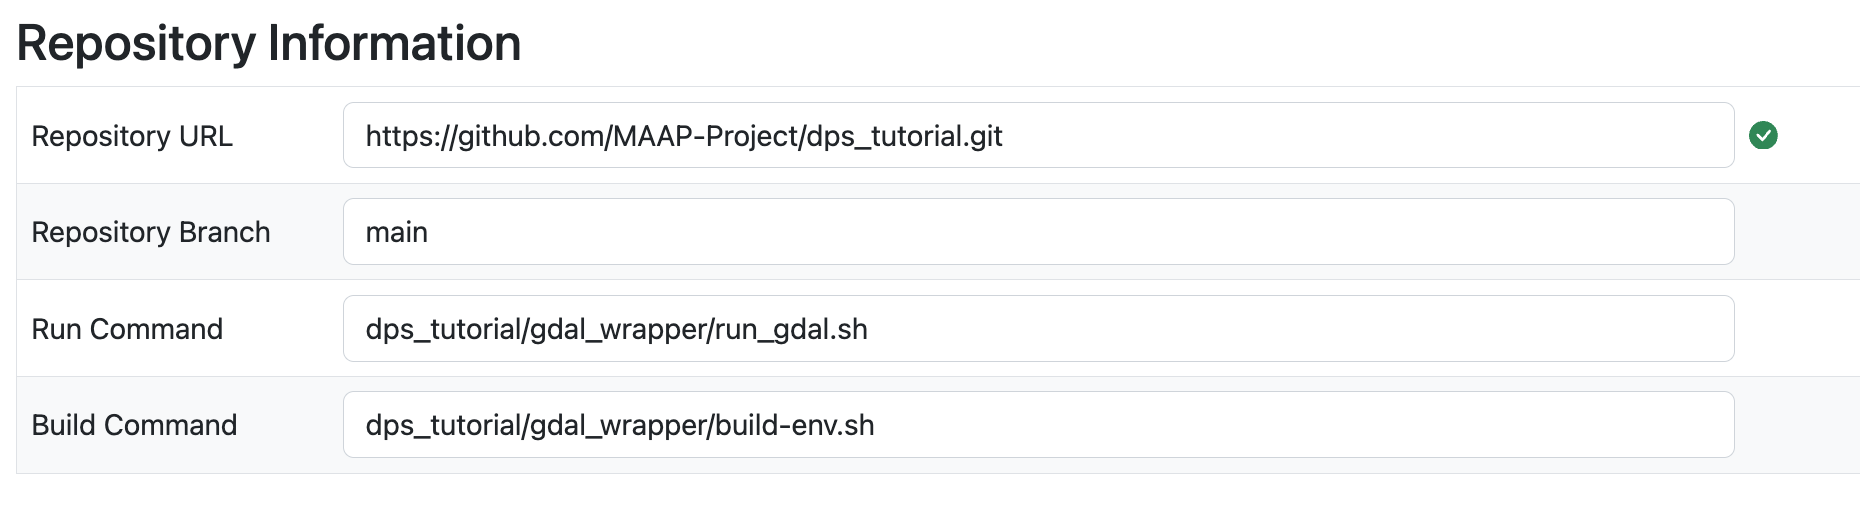
The Repository URL is the .git URL. In the demo repository, it is
https://github.com/MAAP-Project/dps_tutorial.git
Repository Branch is used as a version when this algorithm is registered. For your test it is likely
mainThe Run and Build Commands must be the relative paths of the scripts, starting from the repository root. This will be used by the DPS to build and execute the algorithm. Typically these will be the
repository_name/script_name.sh. In this case we have a run command:
dps_tutorial/gdal_wrapper/run_gdal.sh
and a build command:
dps_tutorial/gdal_wrapper/build-env.sh
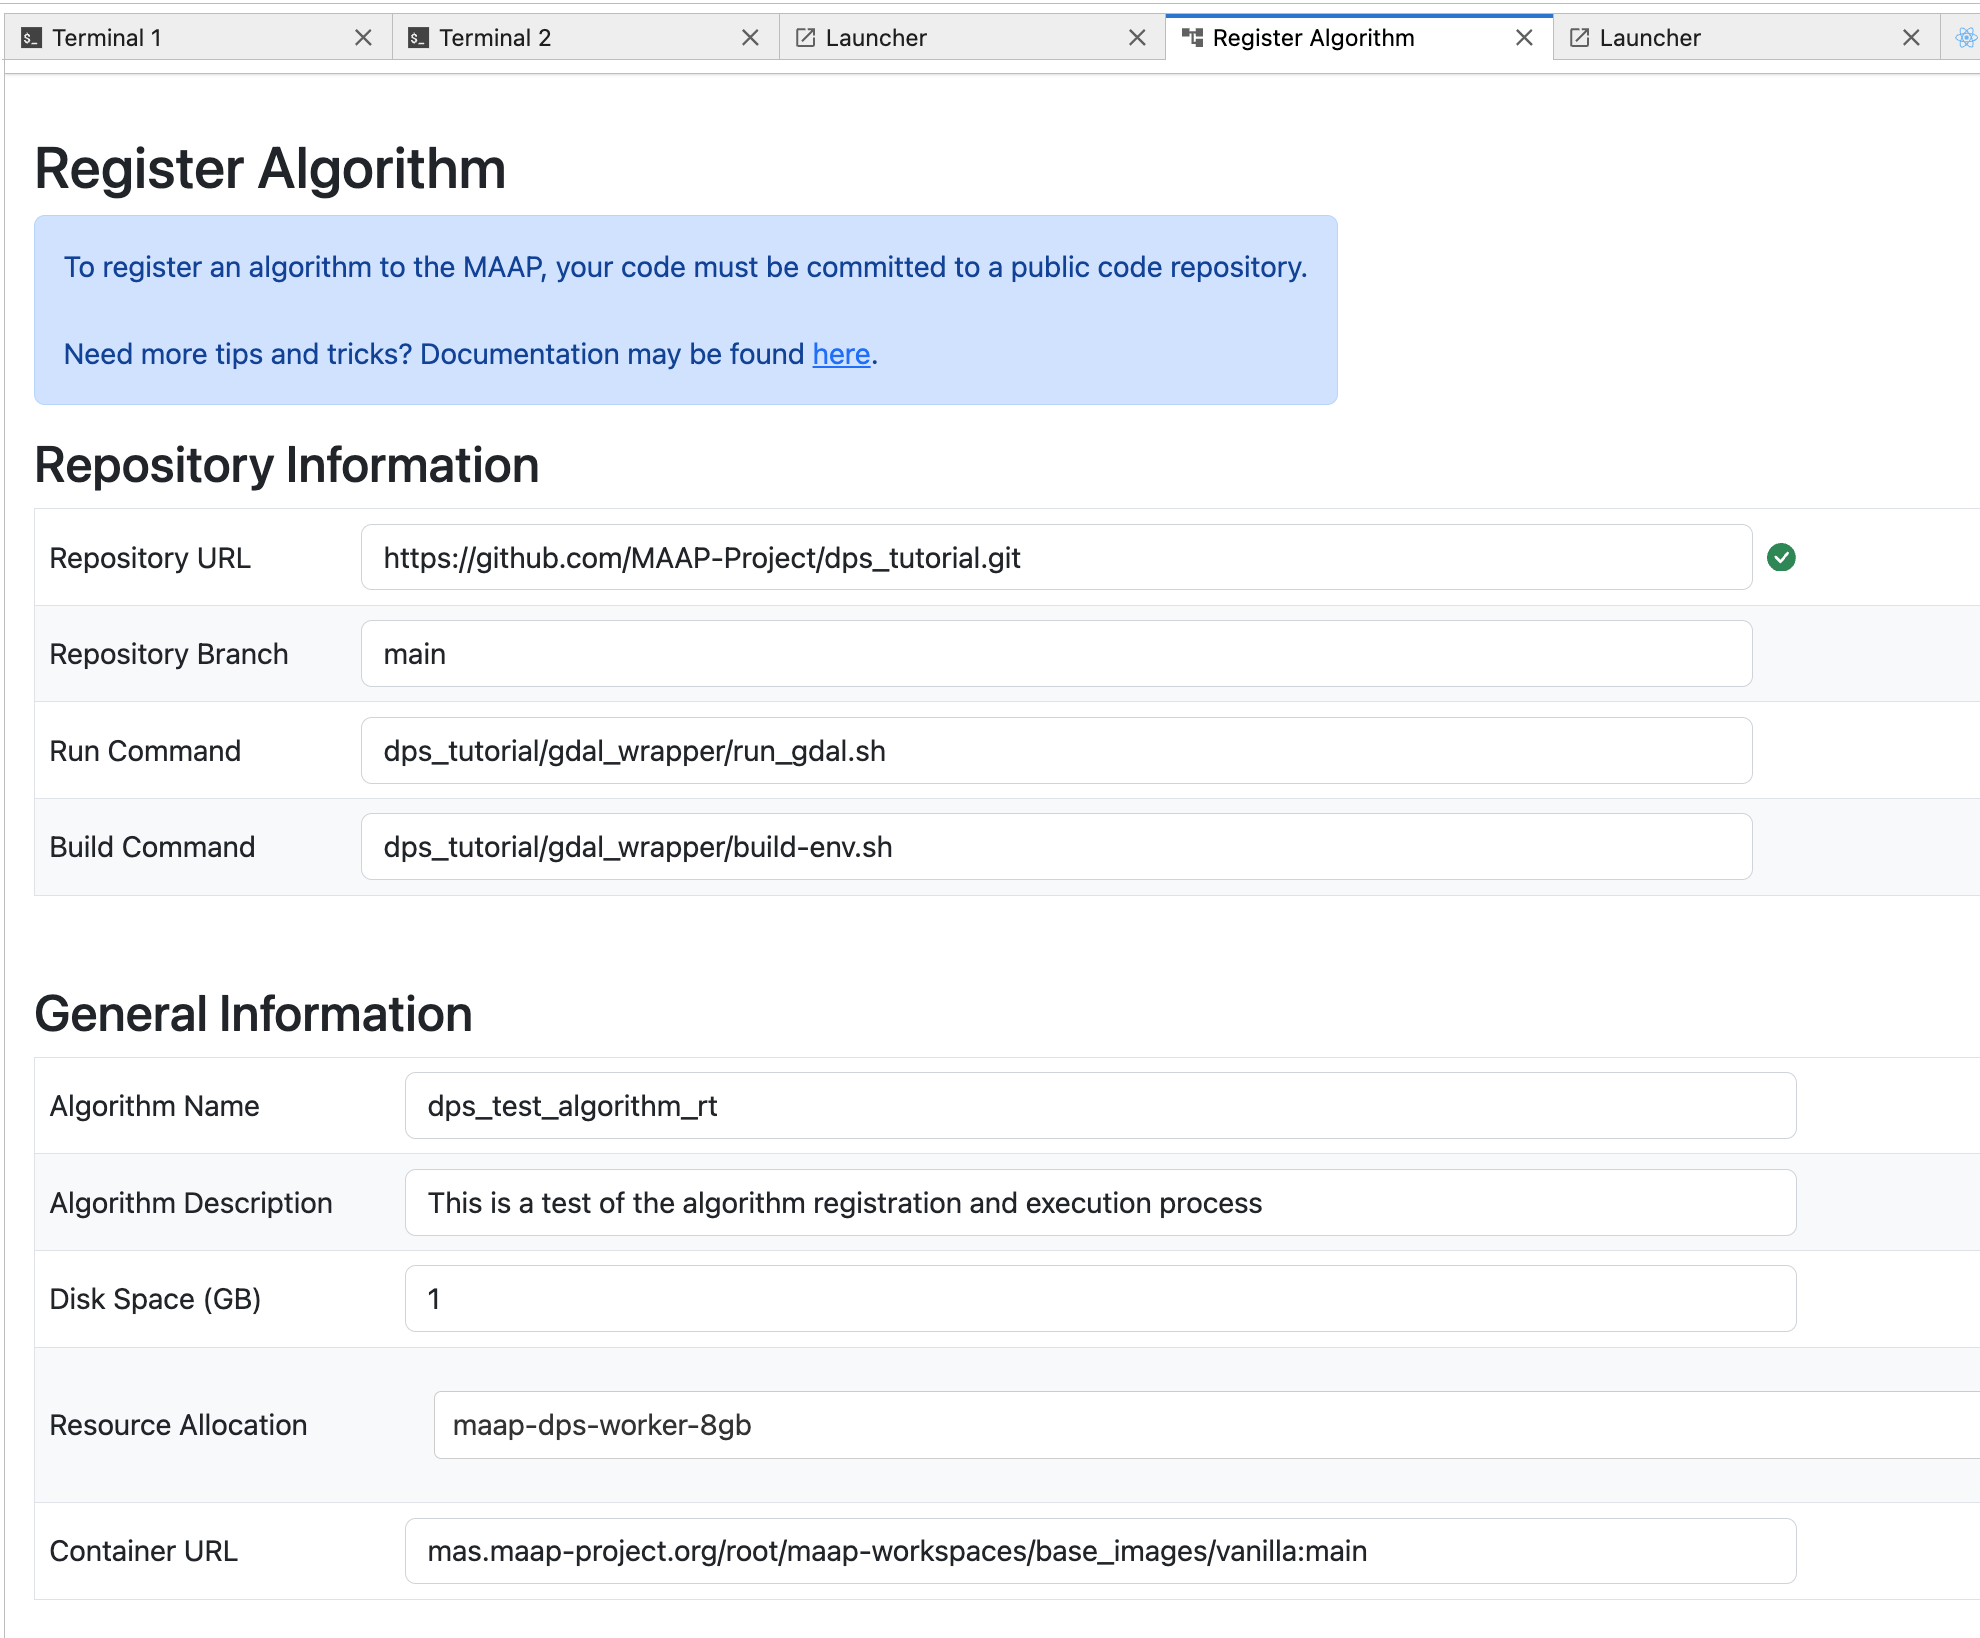
The Algorithm Name will be the unique identifier for the algorithm in the MAAP system. It can be whatever you want. Note: If you use the same name as an existing algorithm, your new algorithm will replace the old one in the system (the old one will be gone). This is also how you would “update” an existing algorithm with a new version of the same name. If you want to have two versions of an algorithm available in the system, you must make the name unique (e.g “alg_v1” and “alg_v2” instead of just “alg”)
Algorithm Description is additional free-form text to describe what this algorithm does.
Disk Space is the minimum amount of space you expect—including all inputs, scratch, and outputs—it gives the DPS an approximation to help optimize the run.
Resource is a dropdown-selection with some options for memory and CPU of the cloud compute you expect to need. The options available to you are based on your MAAP organization membership. Guest accounts will only be able to use the
maap-dps-sandbox. In the example shown here, we choose the smallest amount of RAM because we have a very simple Algorithm,maap-dps-worker-8gb.The Container URL is a URL of the Stack (workspace image environment) you are using as a base for the algorithm. The user-interface will offer two options for this: either the simple base-image that is faster to build (this requires a complete list of dependencies in your algorithm’s requirements.txt file), or the Container of your current workspace. In this example we use the
maap_basecontainer:mas.maap-project.org/root/maap-workspaces/custom_images/maap_base:v4.2.0See the System Reference Guide for more information on Containers.
mas.maap-project.org/root/maap-workspaces/custom_images/maap_base:v4.2.0
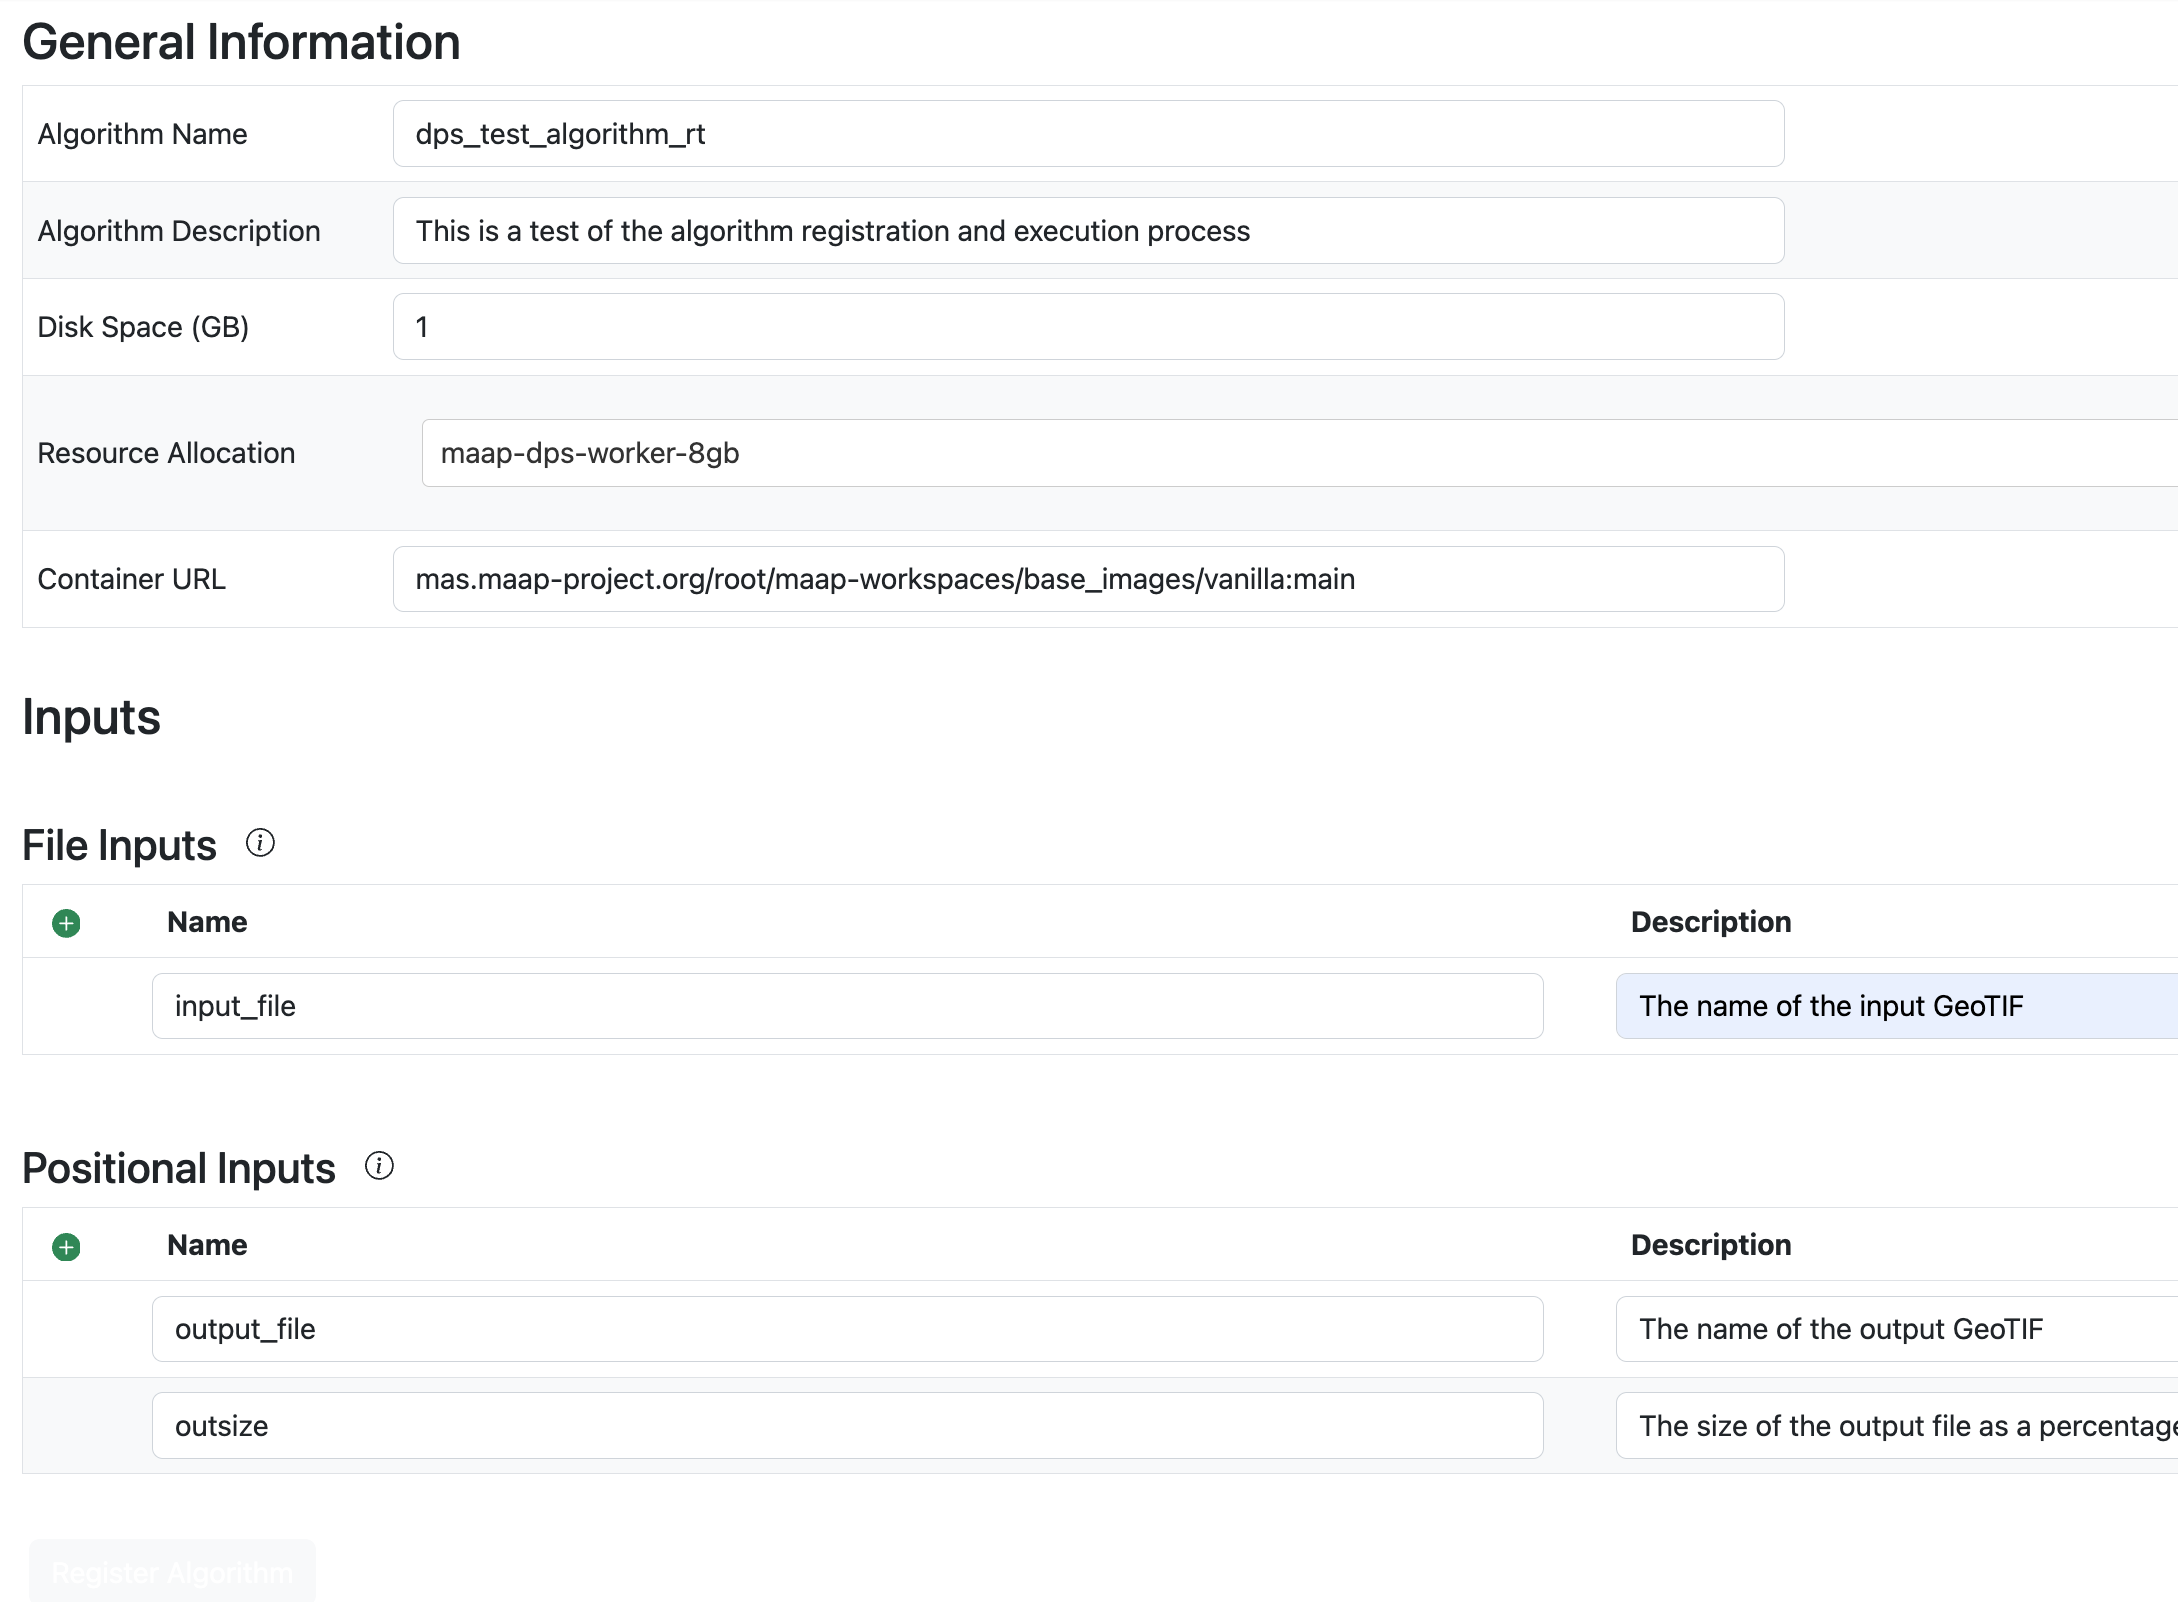
There are File Inputs and Positional Inputs (command-line parameters to adjust how the algorithm runs). In our example we have a File Input called
input_fileand two Positional Inputs: an output file calledoutput_fileand a parameter calledoutsizedescribing how much file-size reduction we want to get. For each input you can add a Description, a Default Value, and mark whether it’s required or optional. Note that the form must follow the order of the inputs used as arguments to the run script–the names of the fields do not need to match, but the order does.
Note
When you Register your Algorithm, the system will use the settings from the Registration form (or yml file, if you used maap.py) and the build-script you specified in Build Command to build an executable container of your code and its environment. When you Run the Algorithm, the system uses the “Inputs” section to present an interface (either via GUI or the submitJob call in maap.py) and starts execution by passing those input-parameters to the command specified in Run Command.
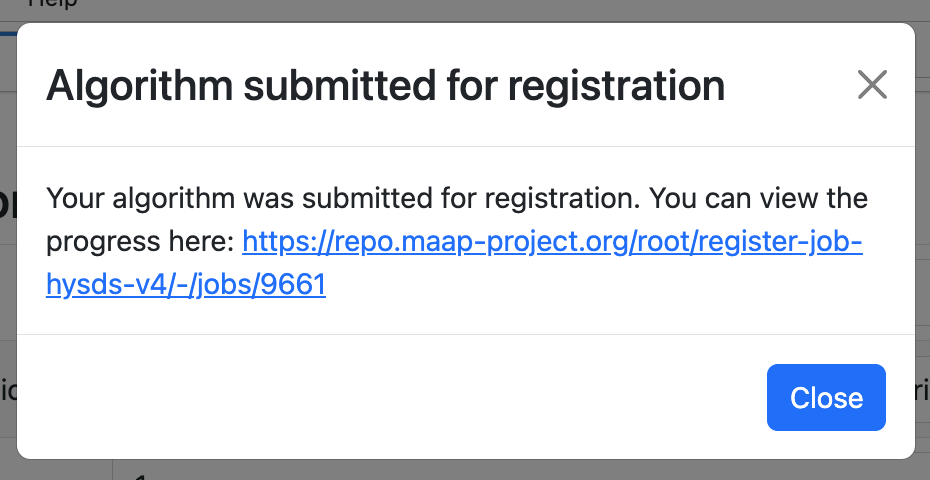
Press Register and there will a popup dialog with a link to view progress of the registration (you should copy the link and paste it into a new page, or open it in a new browser tab). If you close this modal, you can look for your Algorithm build at https://repo.maap-project.org/root/register-job-hysds-v4/-/jobs/
In order to continue, your Algorithm must be successfully registered. The link from the modal dialog will have a screen with a progress log in it. If it is successful and complete, the bottom of the log will look something like this: 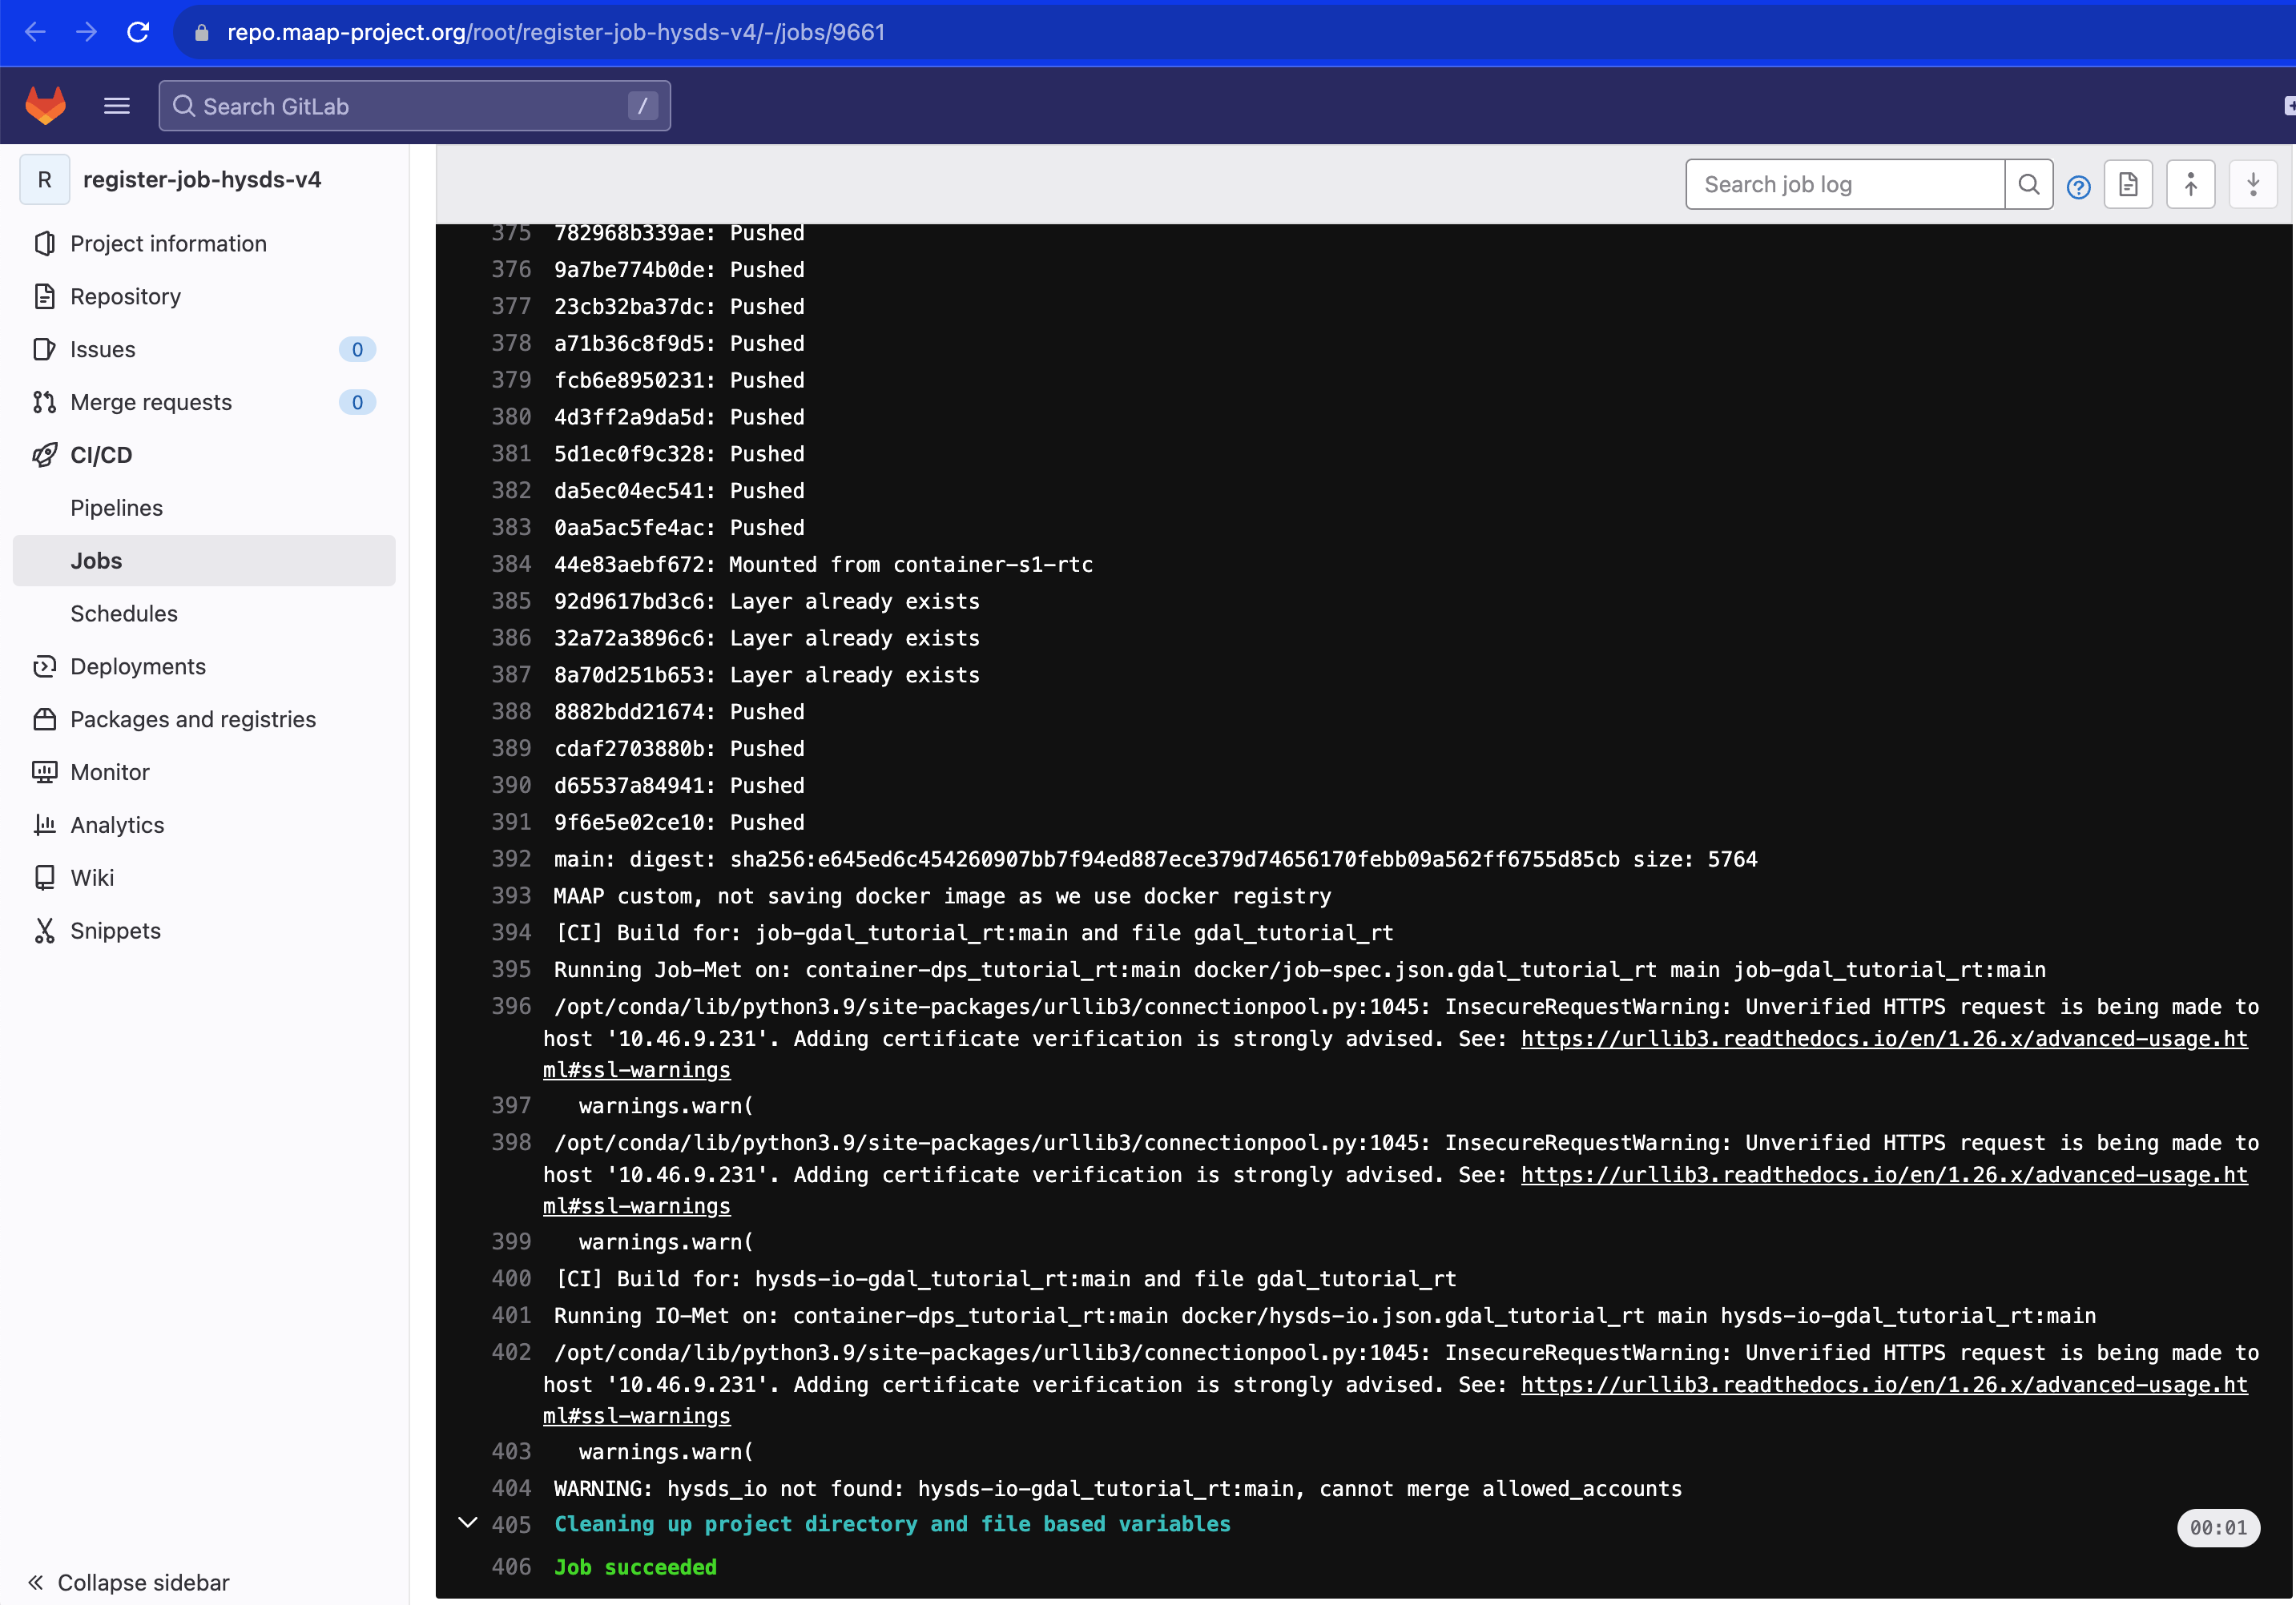
If the registration process failed, the log will look like the below screenshot. In this case you will need to either ask for help, or scroll back up through the log to see what went wrong. 
Running and Monitoring the Algorithm with the Jobs UI
Once your Algorithm has been fully registered, you can try running a Job.
Open the Launcher and select the Submit Jobs icon
Run the job.
Choose the Algorithm name you just registered using the dropdown menu.
The Job Tag can be empty or any list of short terms that you would like to associate with your job. This will help you sort and filter the job list later. It is a comma-separated list of tags. Note that the Job Tag is also used to organize the output files. If you would like to have a set of Jobs run with the same Algorithm to be organized together, use the Job Tag to do so.
The Resource is likely to be the same as the one you chose when registering the Algorithm. For the tutorial it can be the smallest one (8 GB).
The input file can be any GeoTIF file that is accessible by the system. For example, you can browse the MAAP STAC and find a GeoTIF. For example
s3://nasa-maap-data-store/file-staging/nasa-map/ESACCI_Biomass_L4_AGB_V4_100m_2020/S40E160_ESACCI-BIOMASS-L4-AGB-MERGED-100m-2020-fv4.0.tif
The output file can have any name. It should end with .tif because it will be a GeoTIF also.
Outsize is a number from 1 to 100.
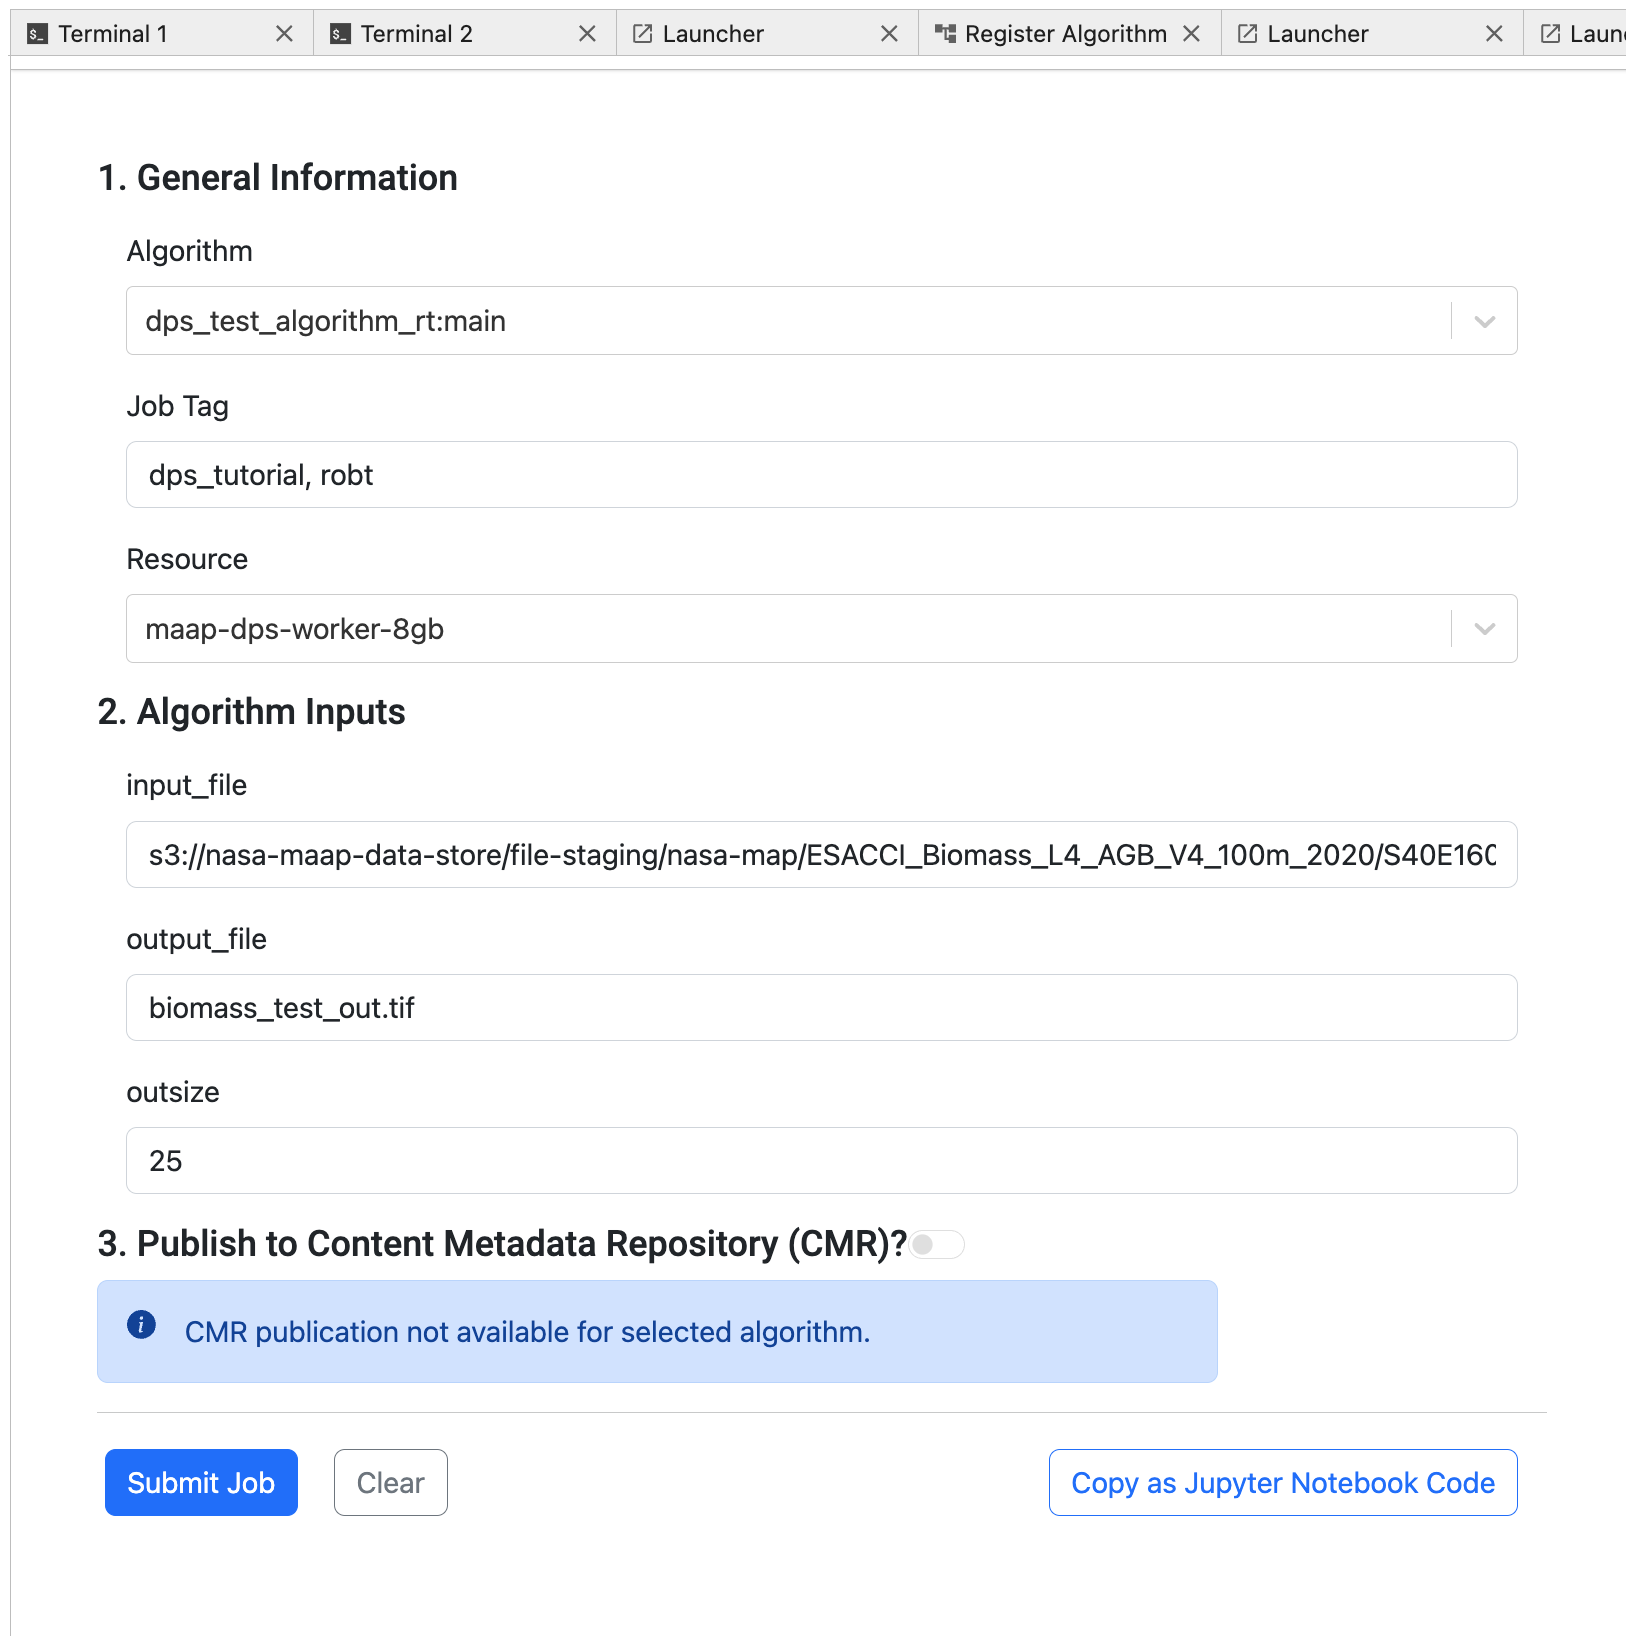
Submit the job and go back to the View tab
When you submit you should see a notification in the bottom right, and a note just under the Submit button, saying that it was successful

at that point, open the Launcher -> View Jobs icon
You can observe the progress of your job while it runs, and the status (complete or fail) when it completes using the View Jobs tab
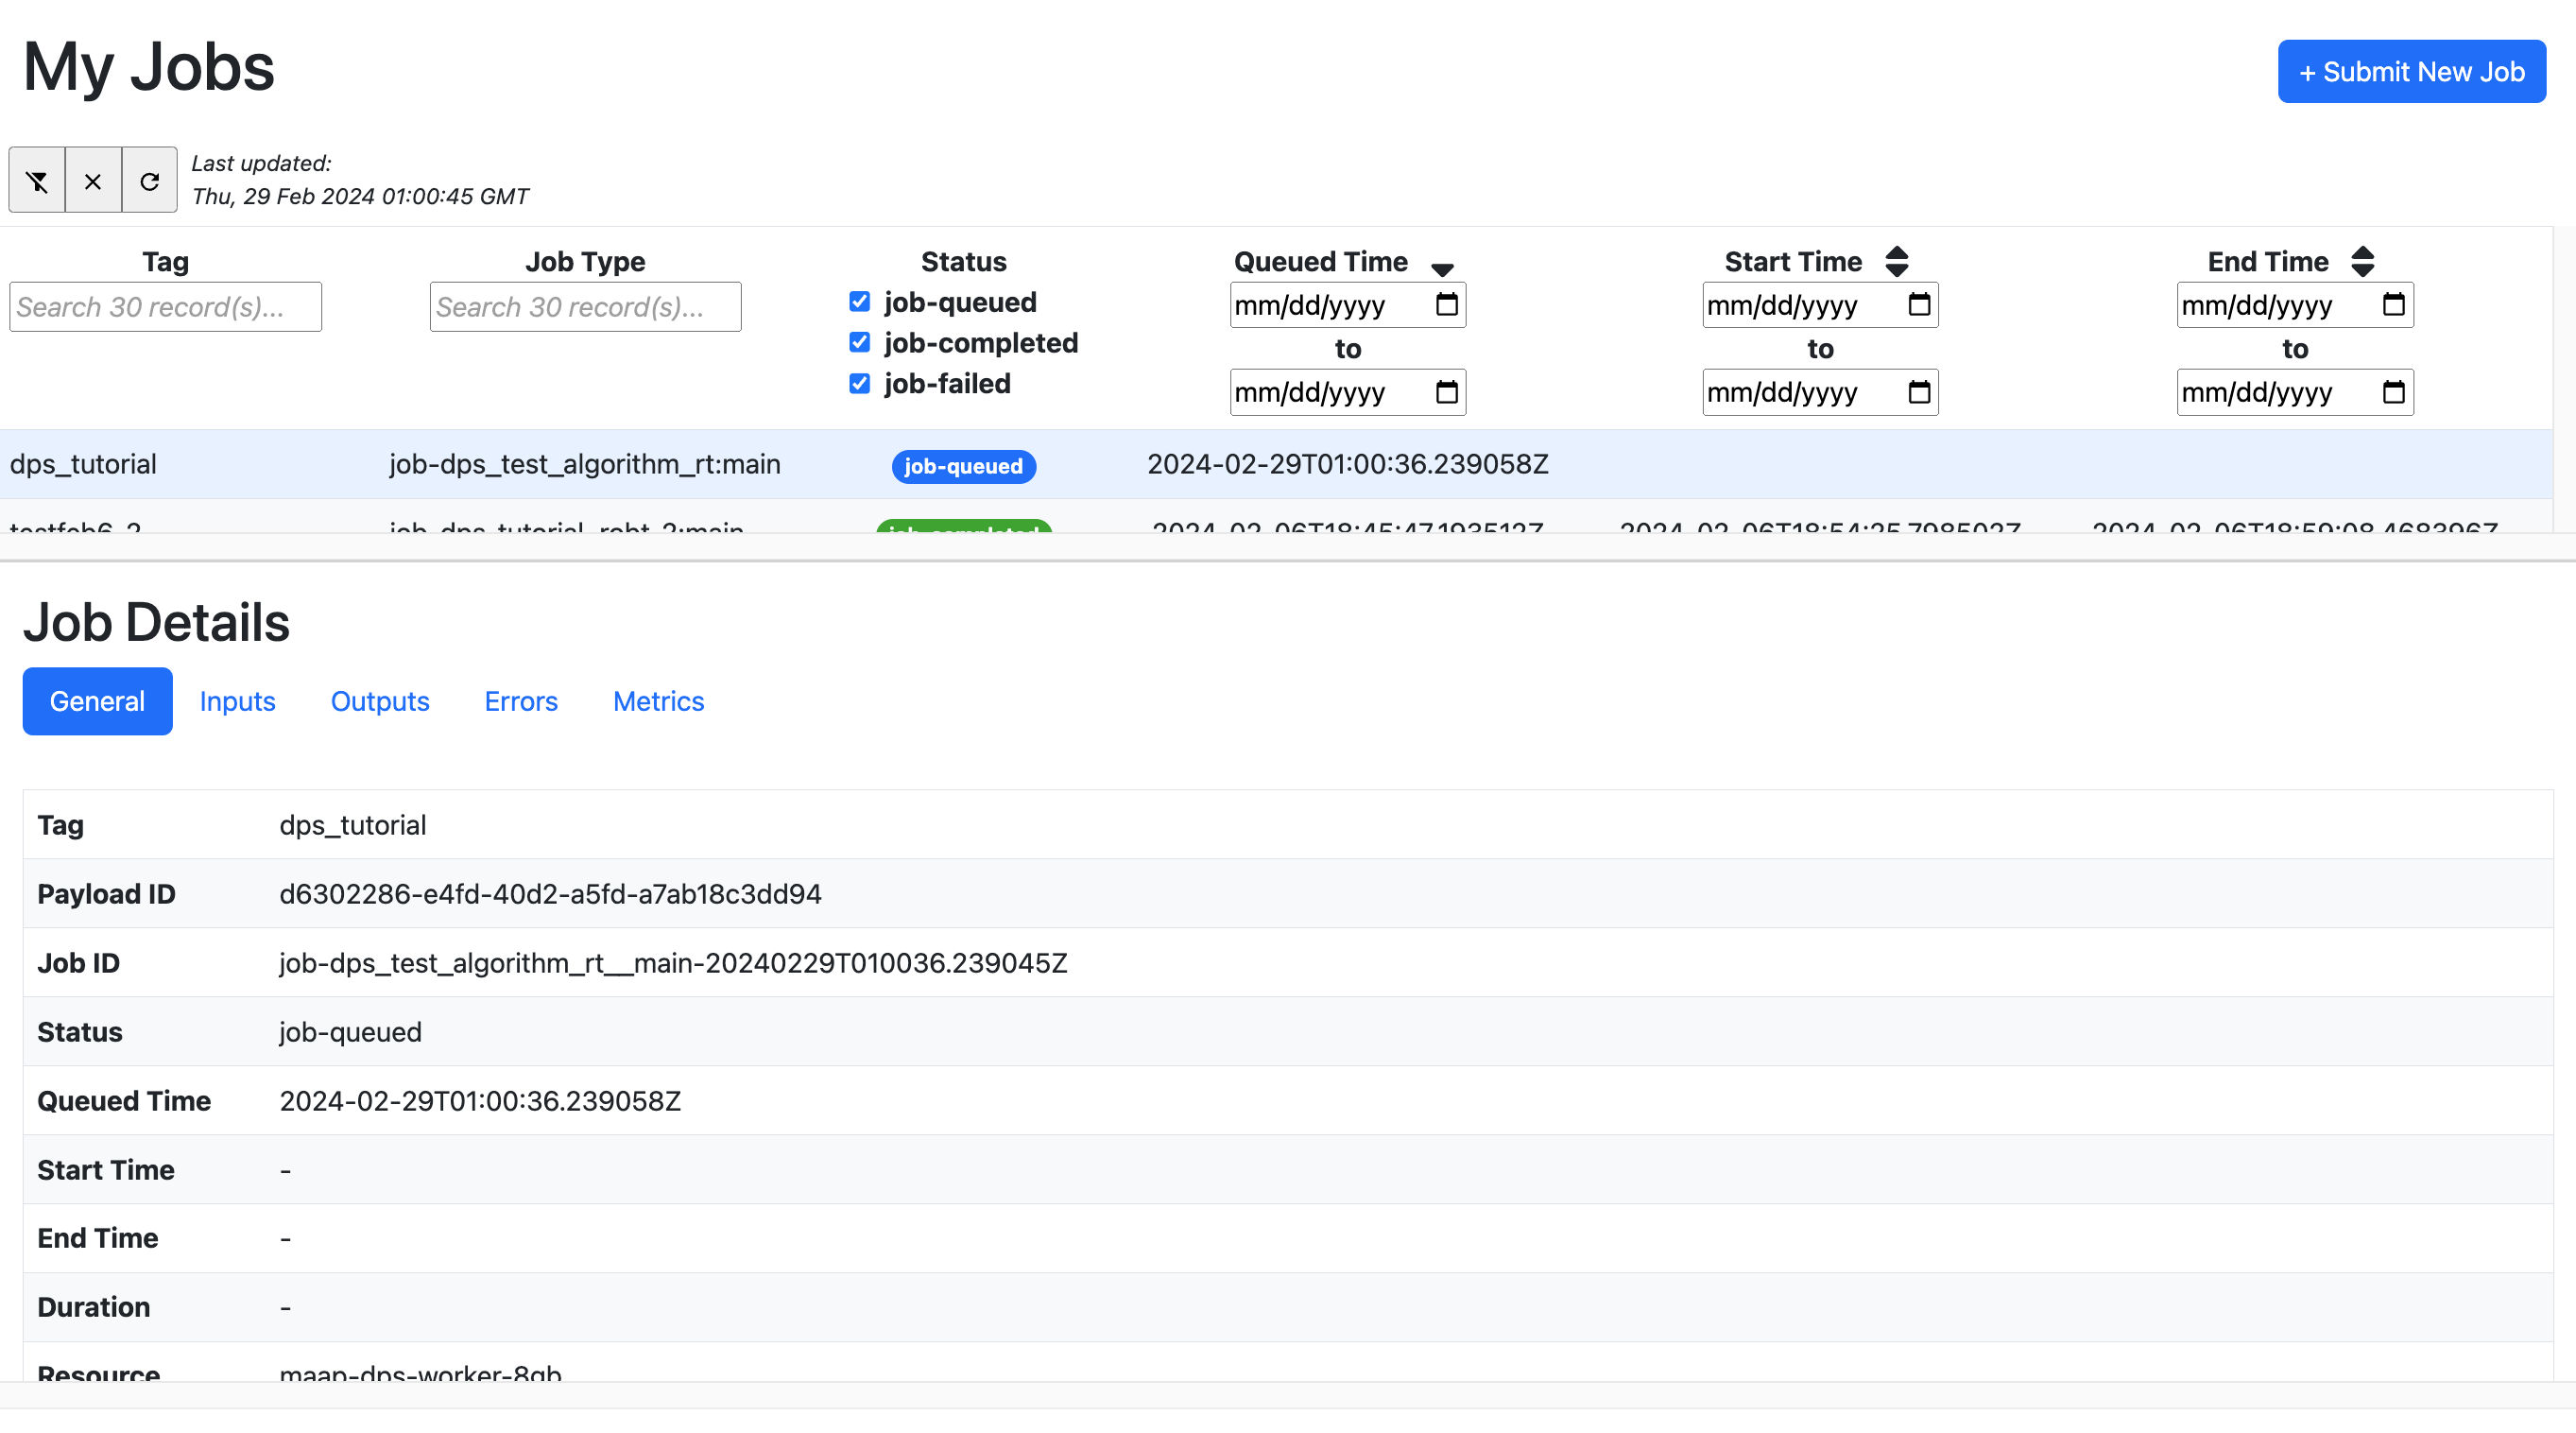
By selecting a row from the table (top panel) it will show Job Details (in the bottom panel)
The status should go from queued to running, to completed or failed
Check the Inputs and Outputs sections of the Job Details
Running and Monitoring using the HySDS Jobs UI (Figaro)
This will be described in a future update. HySDS is the data-processing system used to run the jobs. It has a full web application that is used by NASA missions to monitor jobs and data-outputs. If you would like to beta-test this UI with MAAP, please contact Sujen or George.
Registering and Running the Algorithm using maap.py
Use the DPS Runner notebook template as a starting point for batch-job execution via a Jupyter notebook. Some supplemental background information is below.
It is possible to register algorithms via the maap.py API and a configuration file (in YAML format), using:
maap.register_algorithm_from_yaml_file("/home/jovyan/<my_algorithms_yaml_file>.yml").text
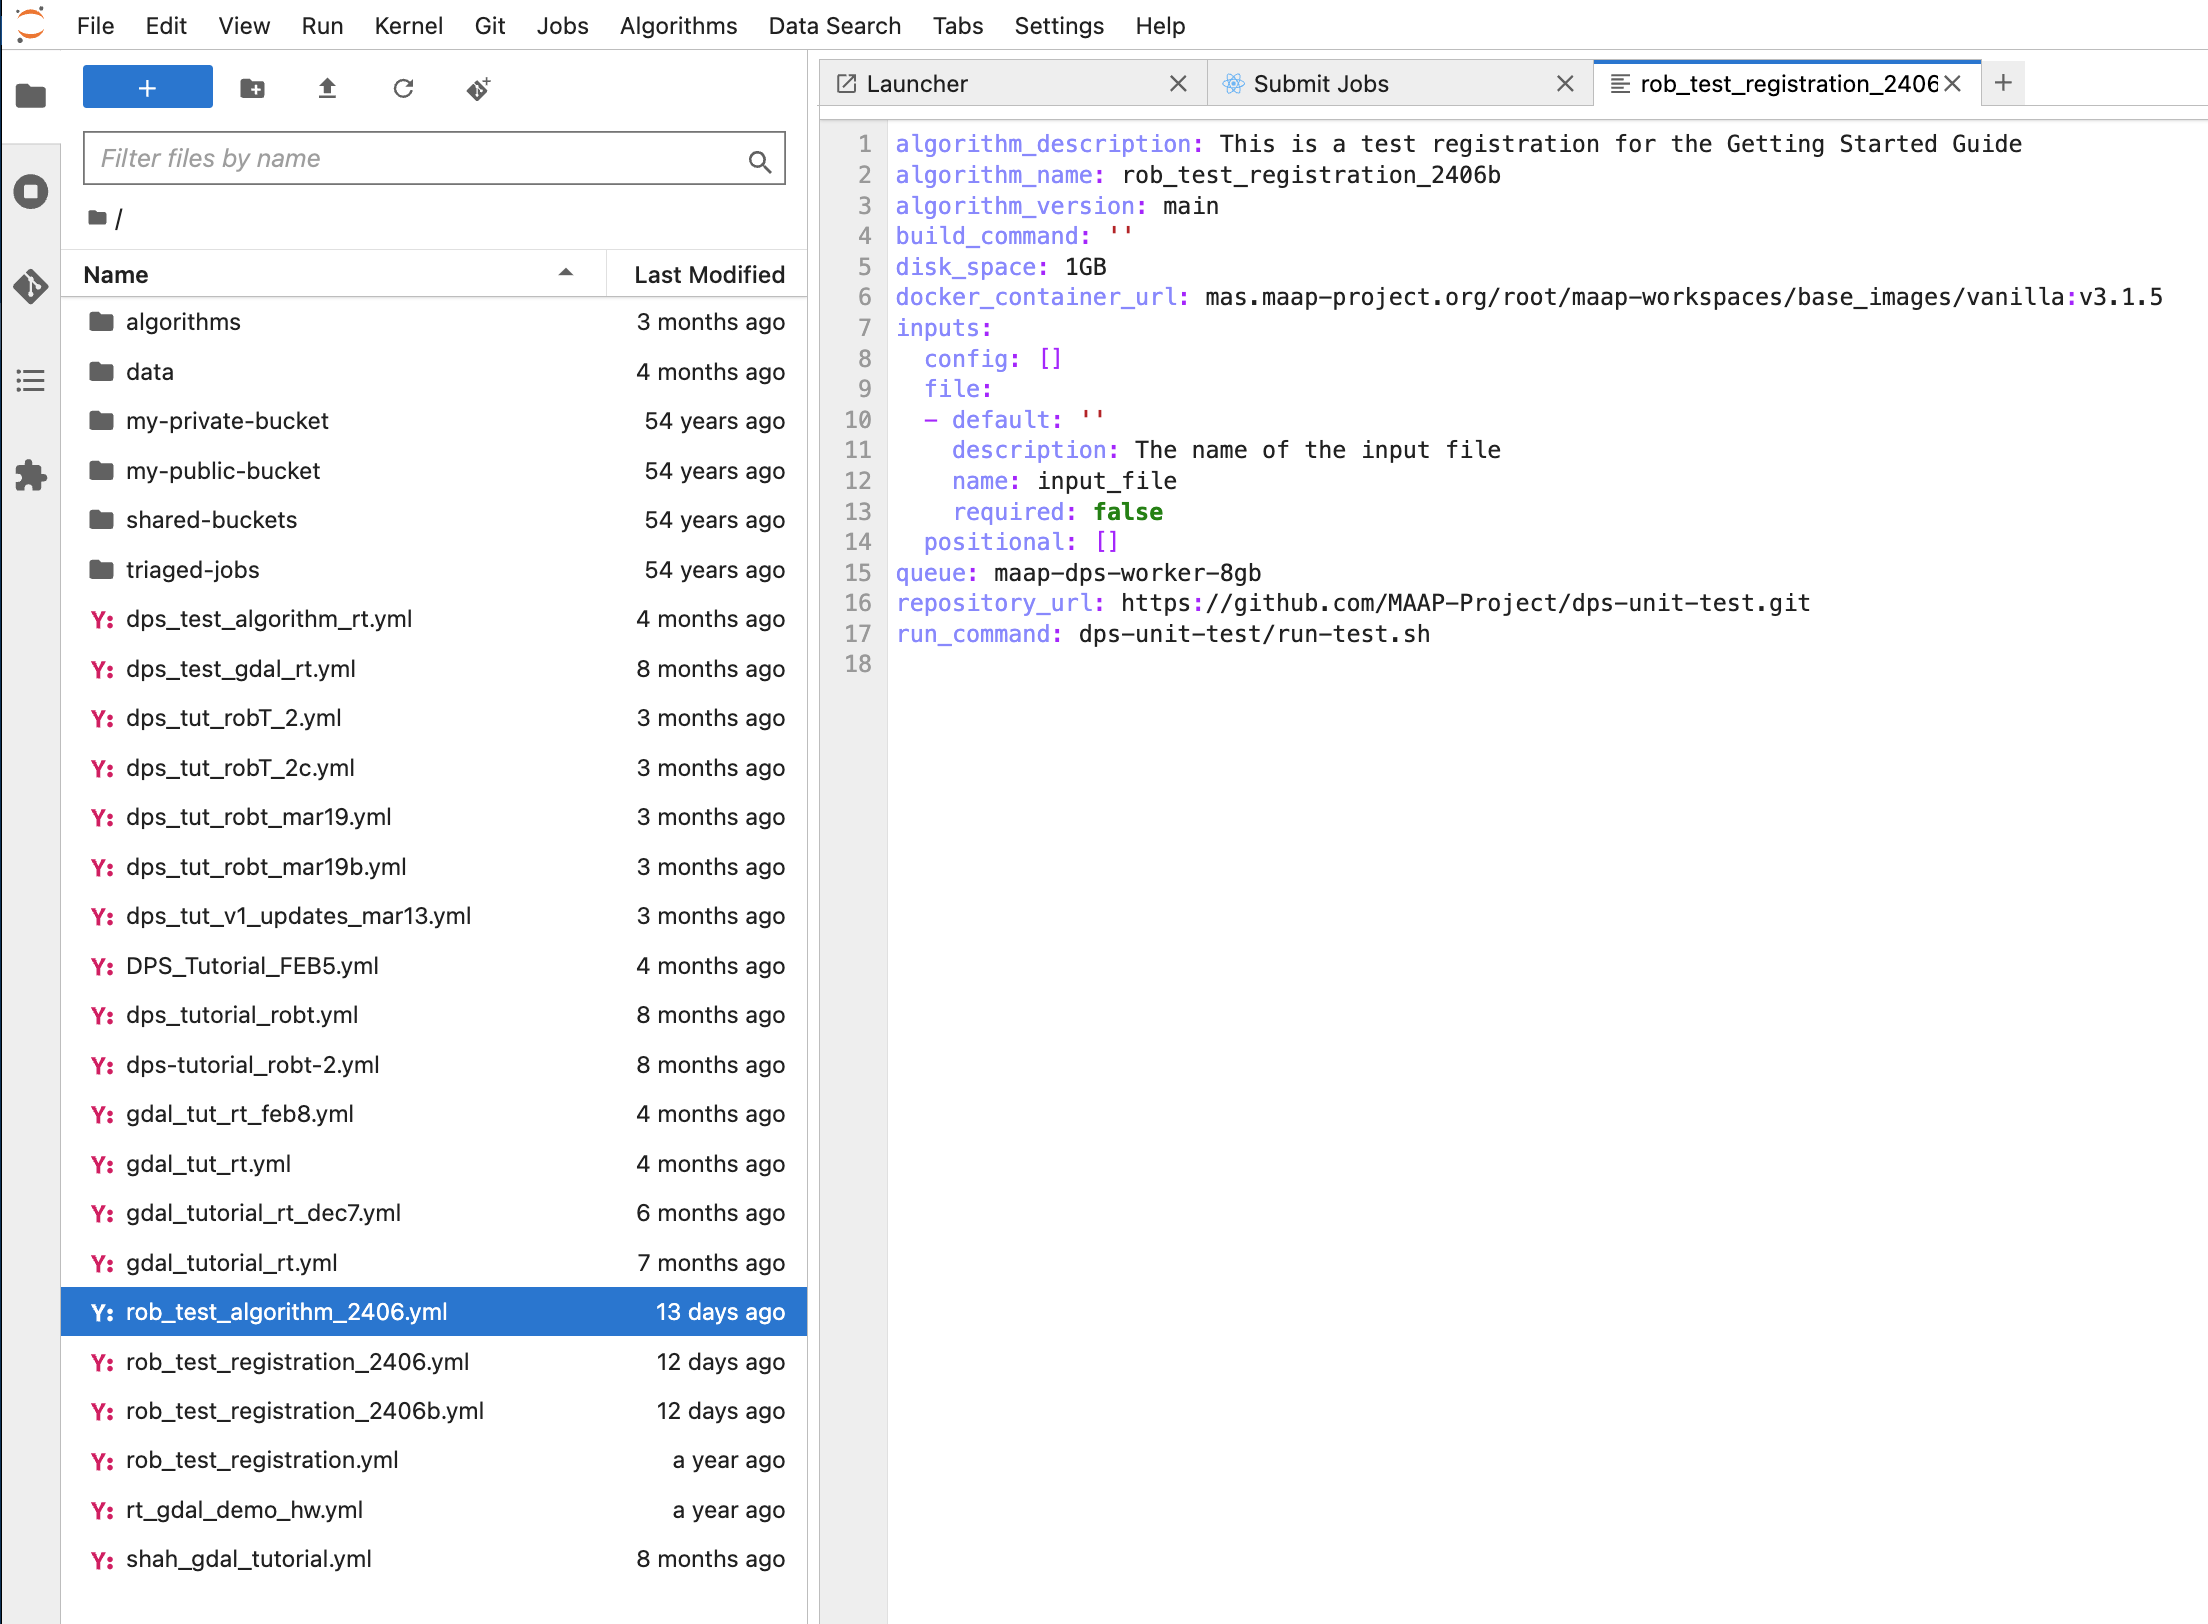
It is automatically generated by the Register Algorithm UI when you first register an algorithm. You will see yml files in your home directory after registering an algorithm via the UI. Open one of these yml files to see what it looks like. If you simply re-reference this file with the maap.py registration function, you can quickly re-register an algorithm with the same parameters that you first typed into the Algorithm Registration UI.
This can be a hand-written yml file: get a template yml here. Compare it to the Register Algorithm UI fields.
Getting the Outputs of the Job
Finding the Output folder for a Job using the Jobs UI
From the Outputs section of your Job, there are two buttons to find the output of your job. One will navigate the Jupyter file-browser to the output folder. If you then create a new Terminal it will also be at that location. The other way is to go to your home folder in a Terminal and then use the Copy Folder Path to Clipboard button, then type cd and paste in the path. 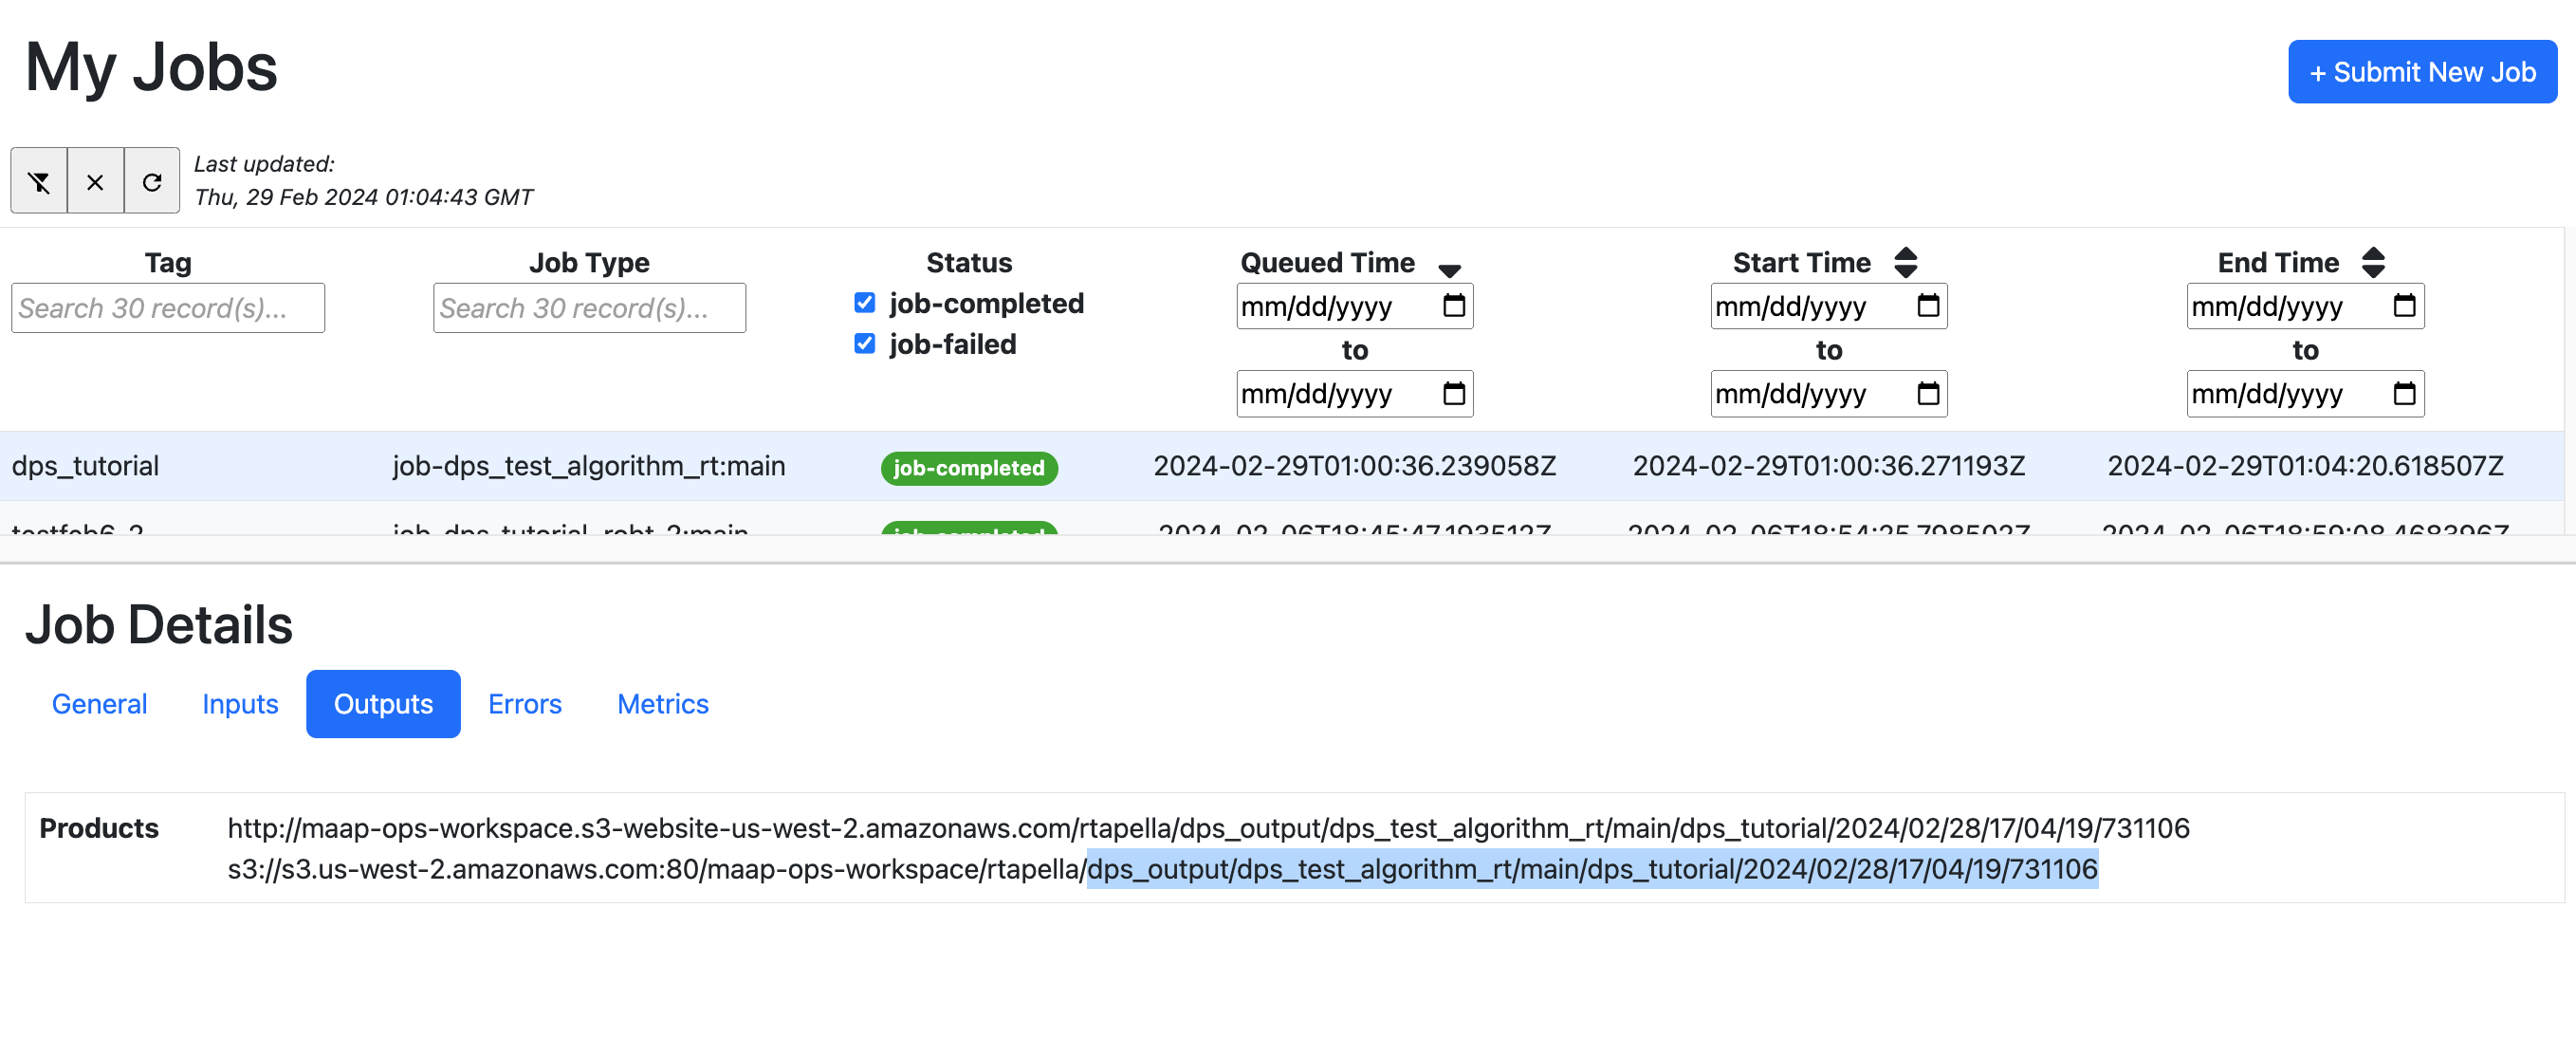
In that folder you will see some JSON files with metadata about the job and the data, as well as the output file (your .tif file). 
Once you have browsed to the output folder in the Jupyter file-browser, you may select Download from the contextual menu (right-click) to download the file(s) of interest.
Browsing the File Tree or using the Terminal
You can also browse the file structure for output files. All the jobs that you run will put output files into ~/my-private-bucket/dps_output. Files are organized in this area by the algorithm name, job tag, and a set of folders organized by date and time.
Frequently Asked Questions (FAQ)
What happens with input and output in DPS?
Since the jobs on DPS are run on a machine on the cloud, your local workspace directories are not available. It is important to pass any files required as inputs for your algorithm using the File parameter type. Any outputs that need to be saved should be placed in a directory called output.
When a parameter is registered as a file input, DPS downloads the corresponding value provided by the user as a file and places it in a directory called input. It is important to note that if the value provided a parameter marked as file during registration is not a valid url, DPS will report an error.
Note: Both input and output directories are relative to your run script.
How does file management happen?
File management i.e. files required for input and files stored as outputs on S3 are taken care of by the DPS. To locate the files created as an output from your job, look into the /home/jovyan/my-private-bucket/dps_output dir on your workspace and navigate to the algorithm type and time of run.
You can also construct the output path of your files by looking at the job info on the Jobs UI or by running maap.getJobResult('job_id')
What is the basedir variable in the run script example?
As we now know that your job on the DPS runs on a cloud machine, it is not possible to know the absolute path of your script before execution. Using
[ ]:
#basedir=$(dirname "$(readlink -f "$0")")
allows you to get the absolute path of the directory in which your run script is present allowing you to set any other executable paths as required by your algorithm.