Jobs UI for Job Management
The Jobs UI allows users to submit and view DPS jobs from their Jupyter workspace. Users can monitor job status, access generated products, view errors, and view other job metadata.
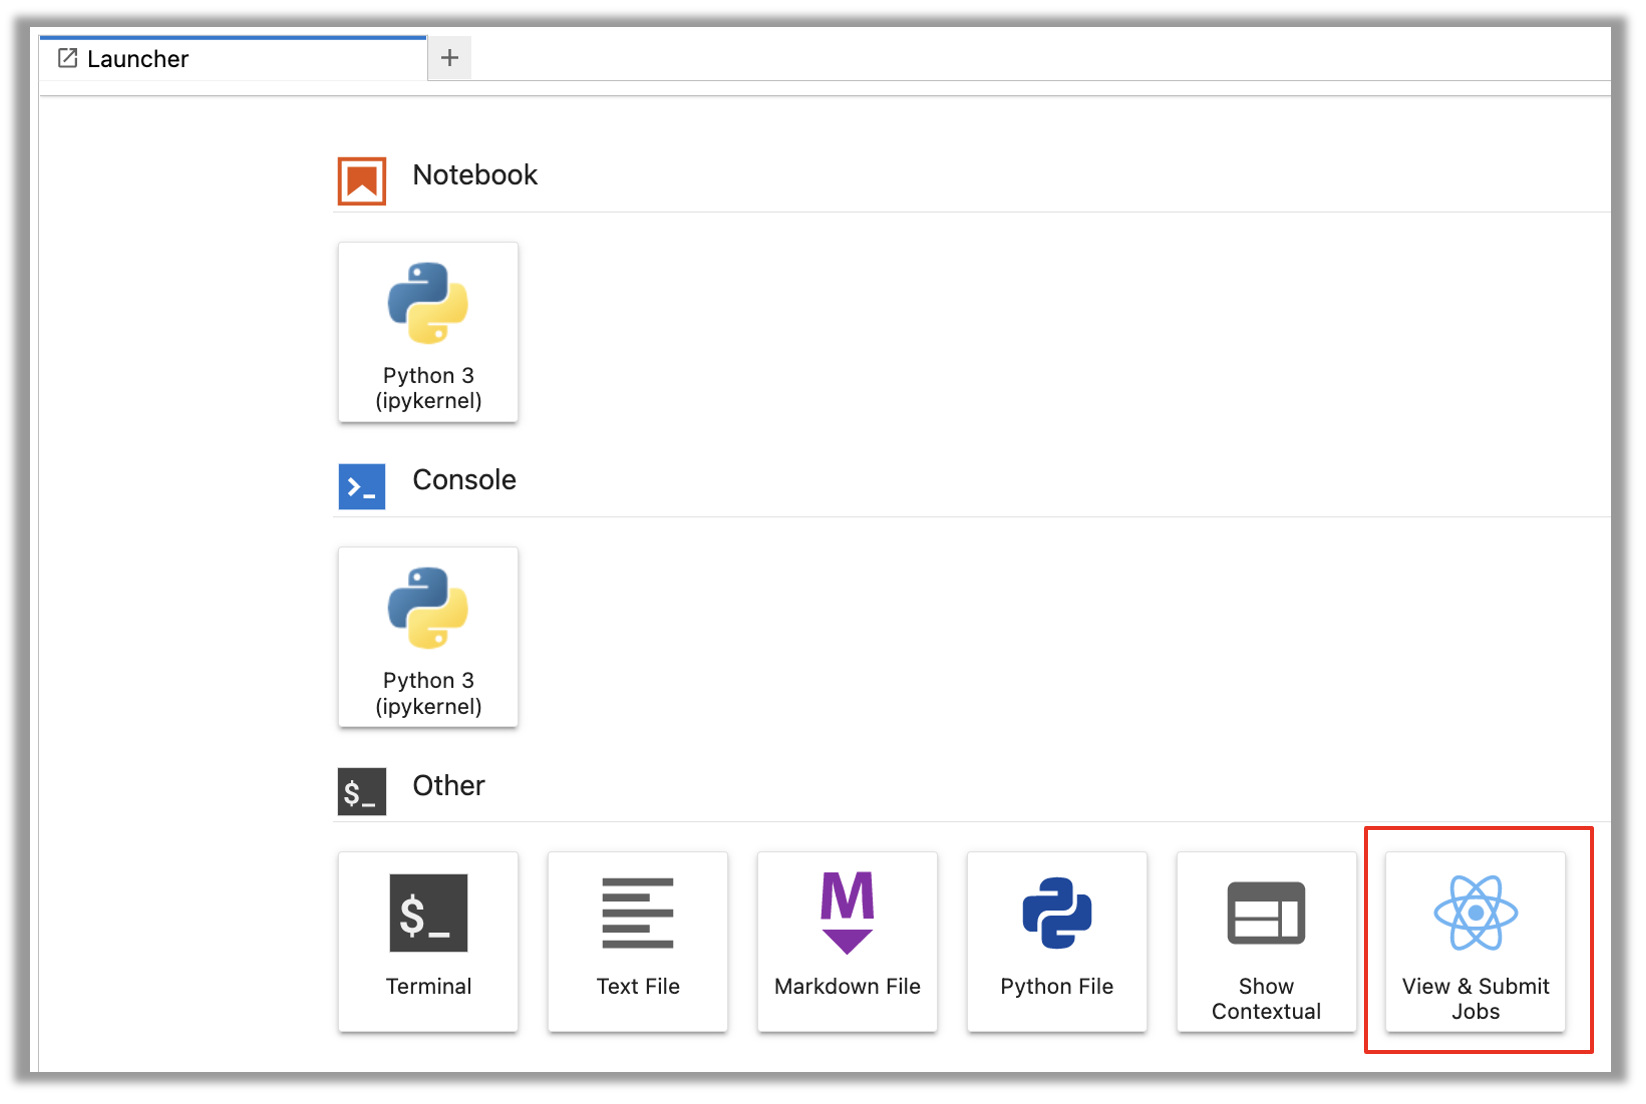
Access the Jobs UI
From your workspace click on the View & Submit Jobs card on the Launcher tab.
View Jobs
The View pane lists all the jobs submitted by the user. The top table shows only a few key fields. Users can click on any row to view detailed data for the selected job such as inputs, outputs generated, and errors produced if the job failed to complete successfully.
Users can sort jobs by queued, start, and end time in ascending/descending order. Users may use the search bar to filter the job list down to jobs containing the user-provided string in any of the fields shown.
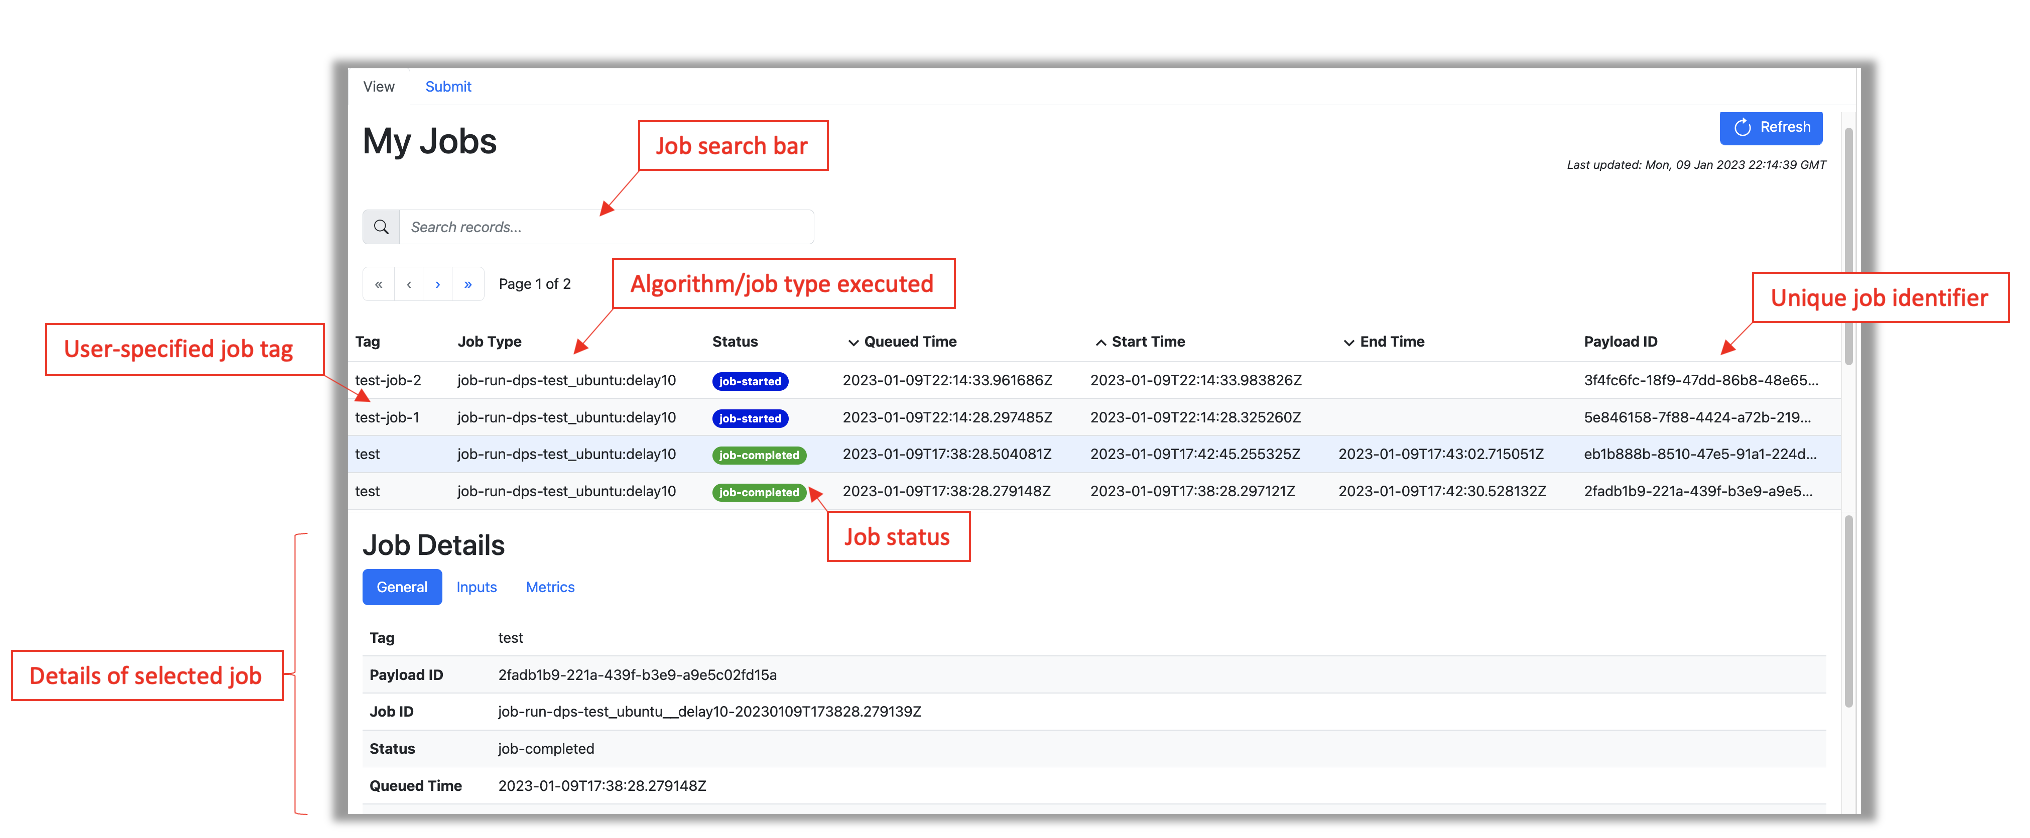
Job Status
Job status may be different between the HySDS Figaro job-monitoring dashboard and the Jobs UI. Below is a mapping of status terms:
MAAP <- HySDS
Accepted <- job-queued
Running <- job-started
Success <- job-completed
Failed <- job-failed
job-offline <- job-offline (your job will automatically re-queue when resources are available; this happens when a spot instance is given to another cloud customer while your job is running)
job-revoked <- job-revoked (when a queued or running job is stopped before completion)

HySDS state not valid/used in MAAP: job-deduped
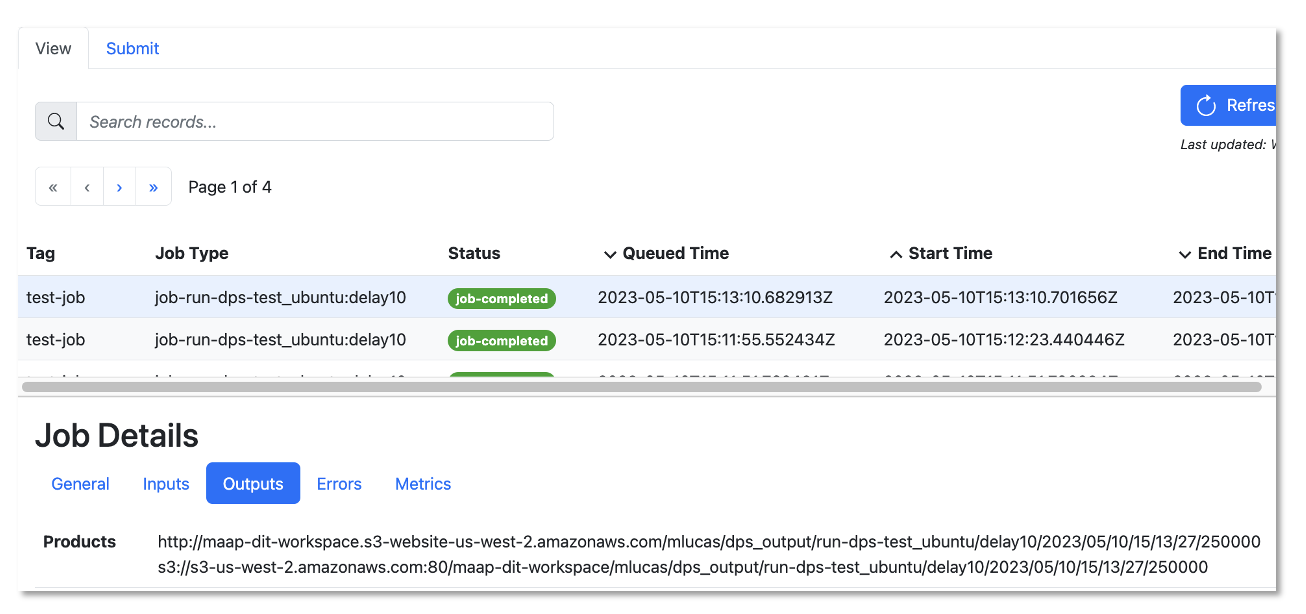
Viewing the Output of a Job
Select your job then under the Job Details table, click the Outputs tab. The Products field provides the path to the product directory within the workspace.
Navigating to the product directory for the selected job above shows the following:
(pangeo) root@workspacelbx1uqgeyqdei83w:~/my-private-bucket/dps_output/run-dps-test_ubuntu/delay10/2023/05/10/15/13/27/250000# pwd
/projects/my-private-bucket/dps_output/run-dps-test_ubuntu/delay10/2023/05/10/15/13/27/250000

(pangeo) root@workspacelbx1uqgeyqdei83w:~/my-private-bucket/dps_output/run-dps-test_ubuntu/delay10/2023/05/10/15/13/27/250000# ls
_stderr.txt  _stdout.txt  output-2023-05-10T15:13:27.250000.context.json  output-2023-05-10T15:13:27.250000.dataset.json  output-2023-05-10T15:13:27.250000.met.json  write-output.txt
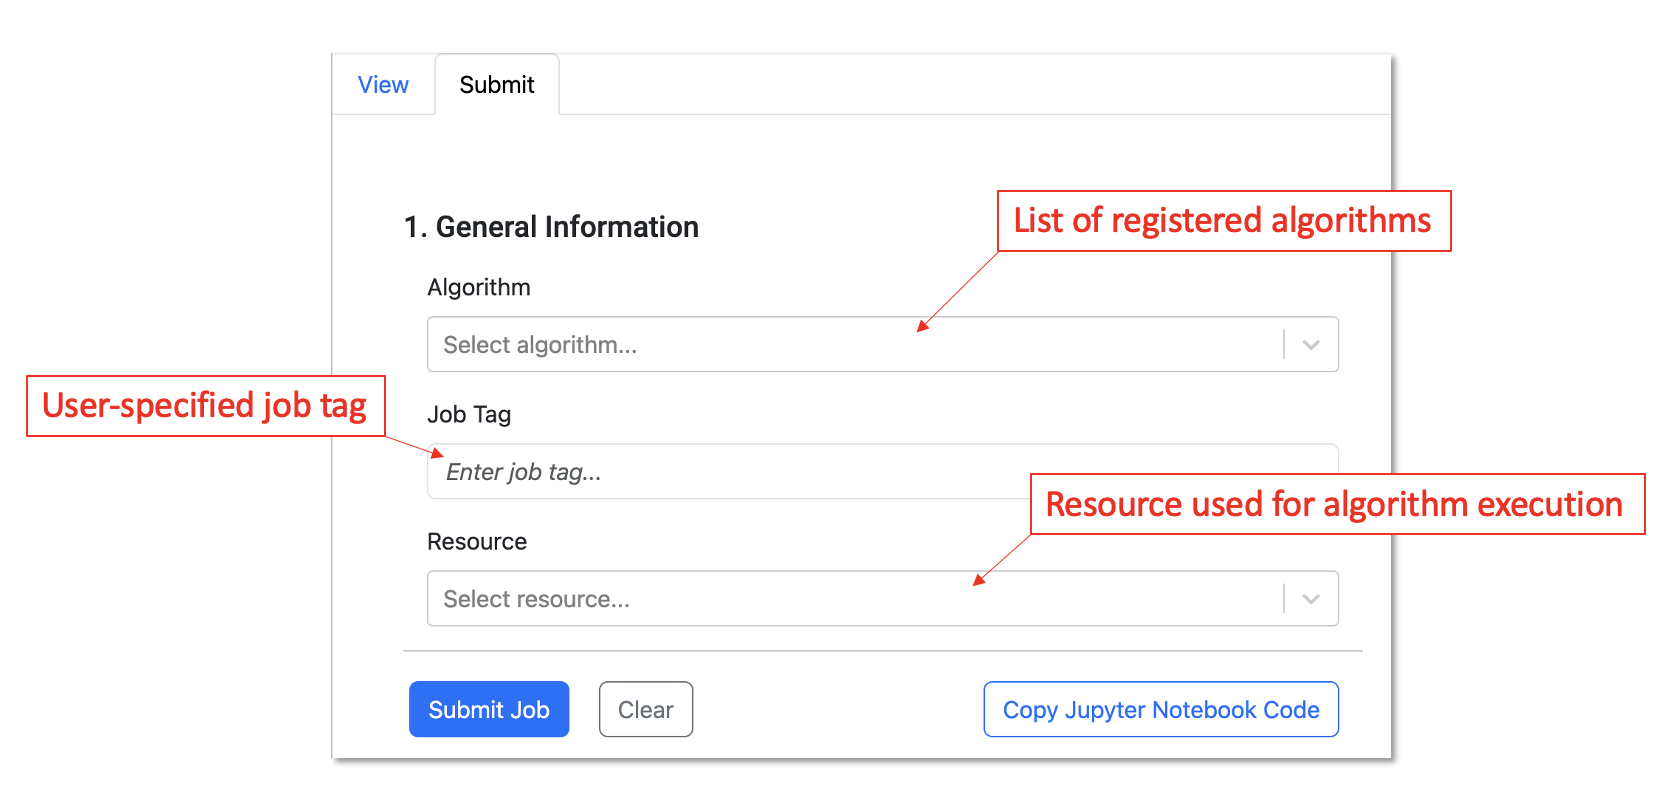
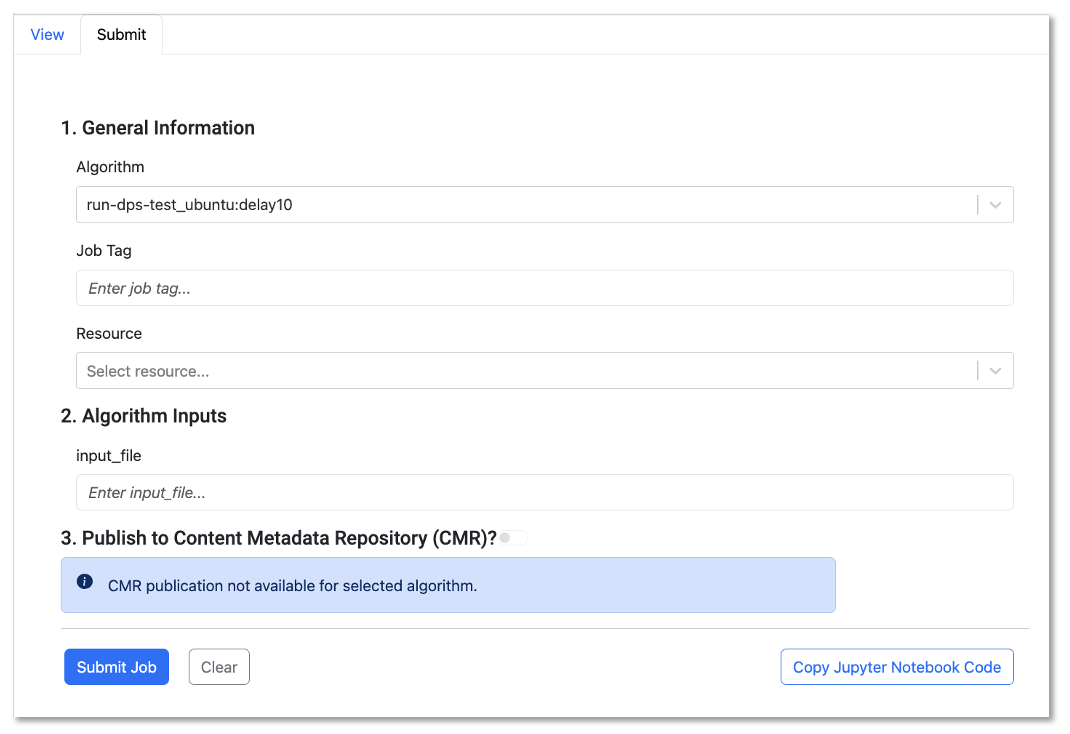
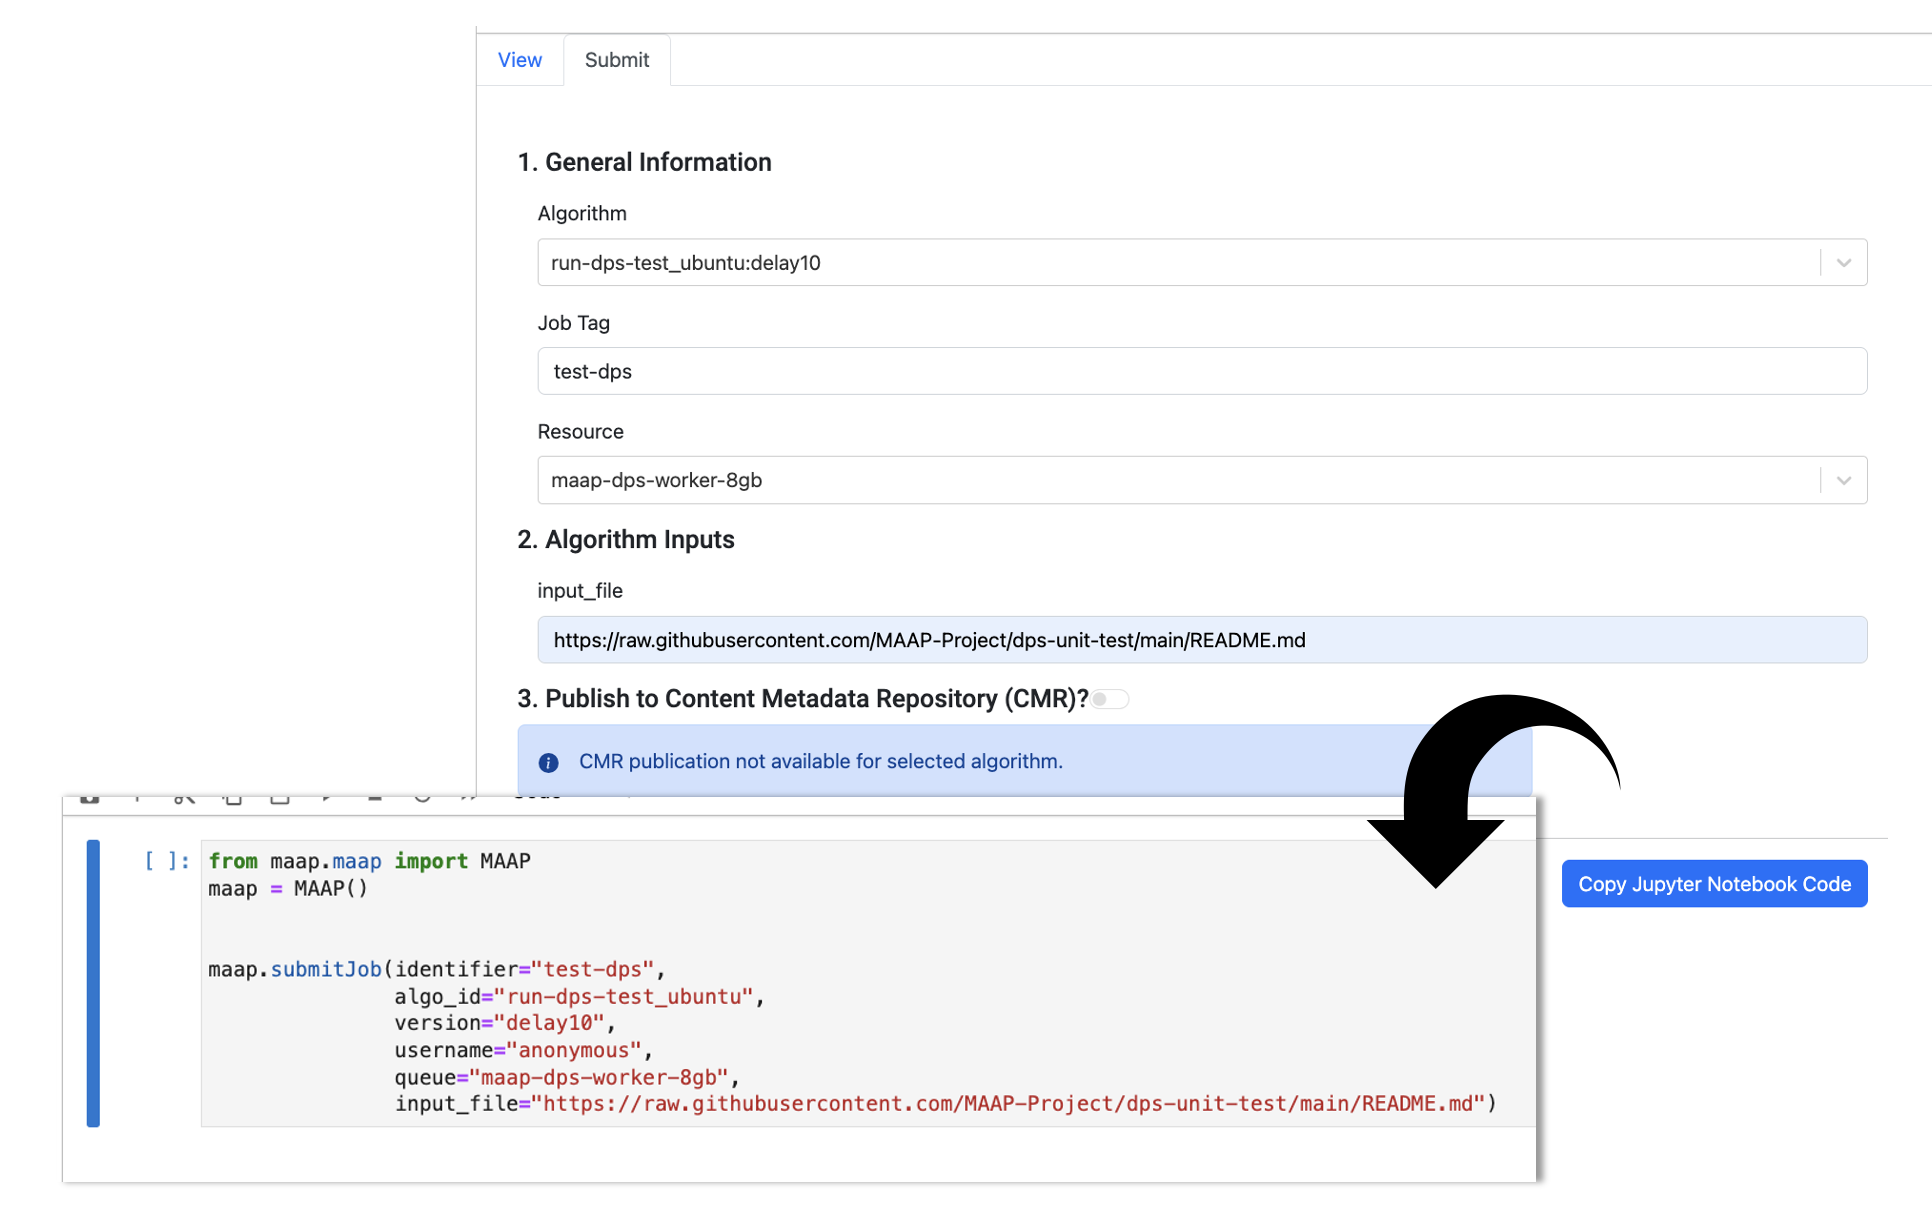
Submit a Job
Users can submit individual jobs from the Submit pane. The following are the minimum requirements for submitting a job:
Select an Algorithm from the dropdown menu. Note: only registered algorithms will be shown.
Provide a Job Tag that may then be used to easily search for and identify the submitted job. This is the same as the
identifierfield in the maap.py submitJob() function.Select the Resource to use for algorithm execution. This indicates the memory and disk space available.
Note
Experimental feature: The output data will be put into a folder named for your Algorithm and the Job Tag. You can use the same Job Tag on several jobs (e.g. in a batch) to group related output data in one place. In maap.py submitJob this is the identifier field when you use submitJob().
Algorithms may contain additional inputs that users may have to provide.
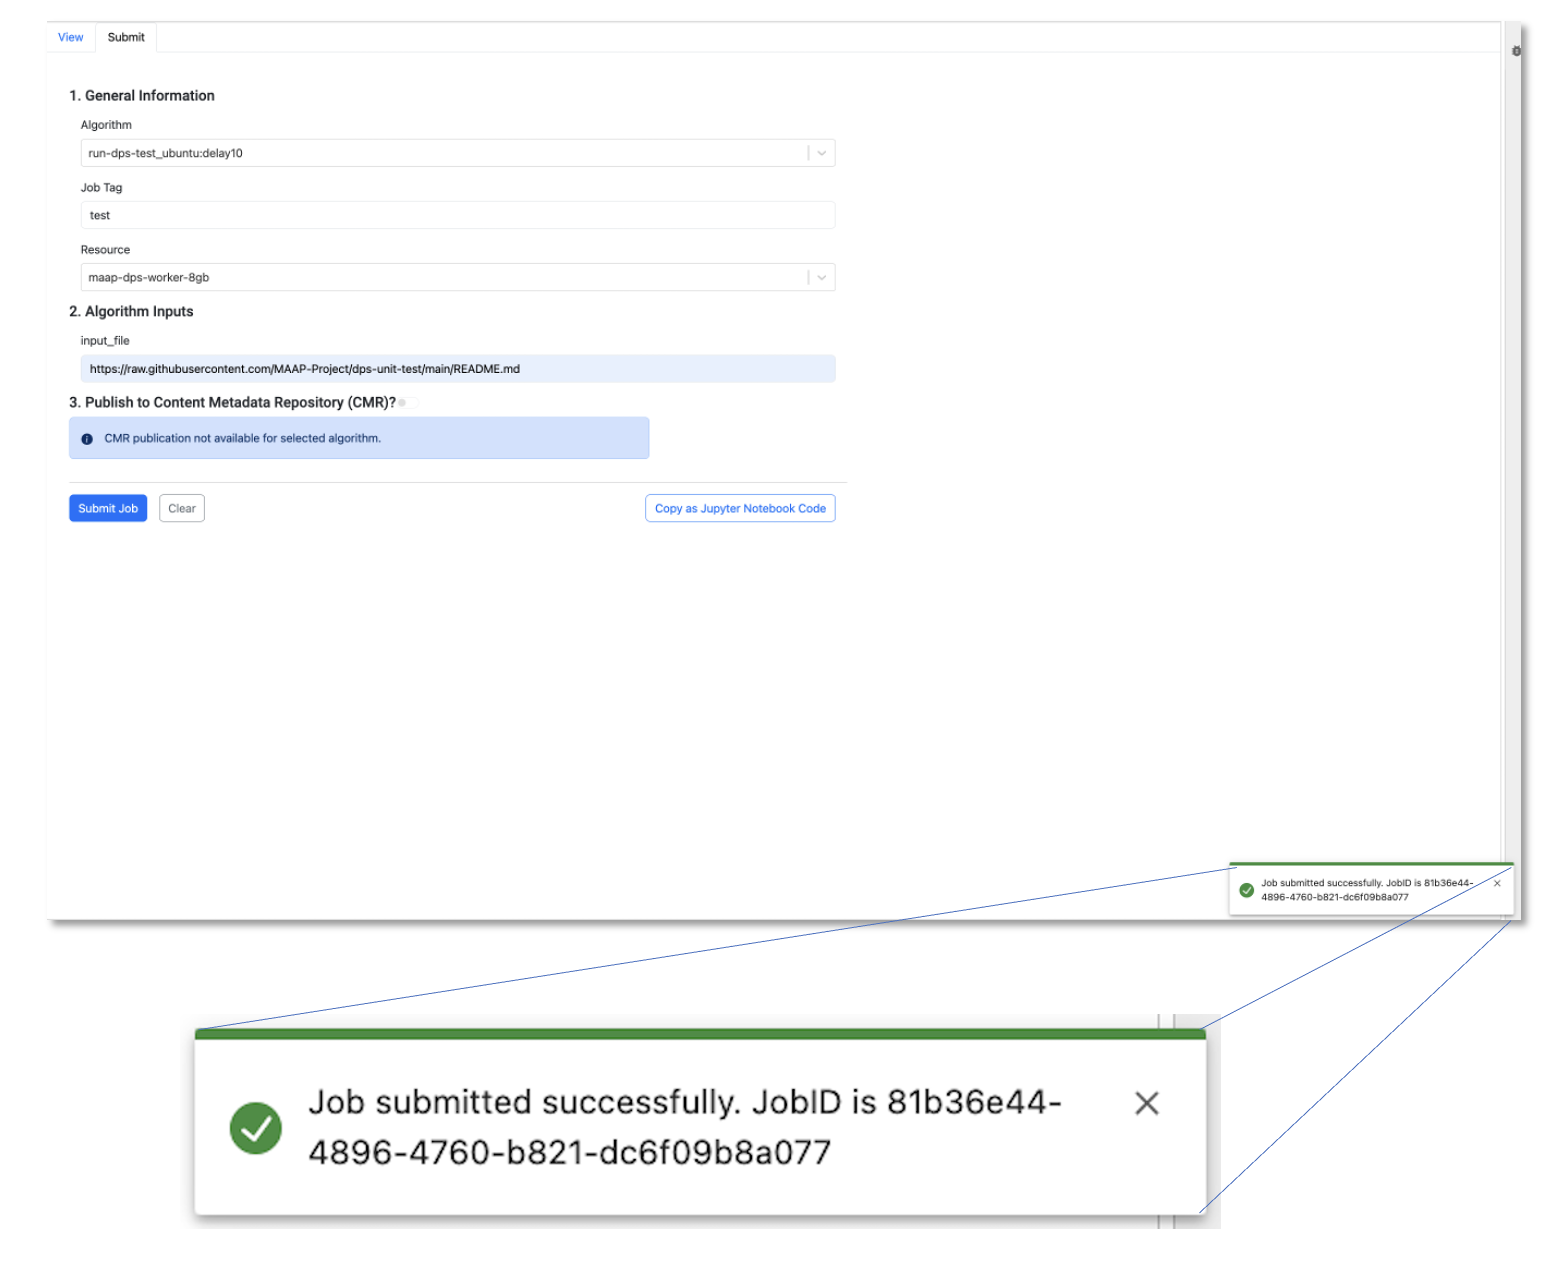
Once all inputs have been provided, the user may click Submit Job to submit the job. If the job was submitted successfully, a toast will appear in the bottom right corner containing the unique job id. Please give the Submit Job button a second to execute.
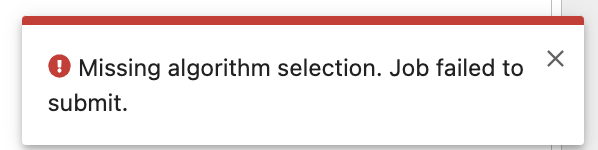
If the job failed to submit, a toast will appear indicating the job failed to submit.
Generate Job Submission Command
Users may fill out the job submission form and - instead of submitting the job - click the Copy Jupyter Notebook Code button to copy the maap-py job submission command to their clipboard to then paste it into a Jupyter notebook.
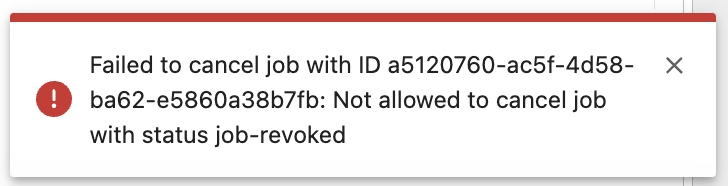
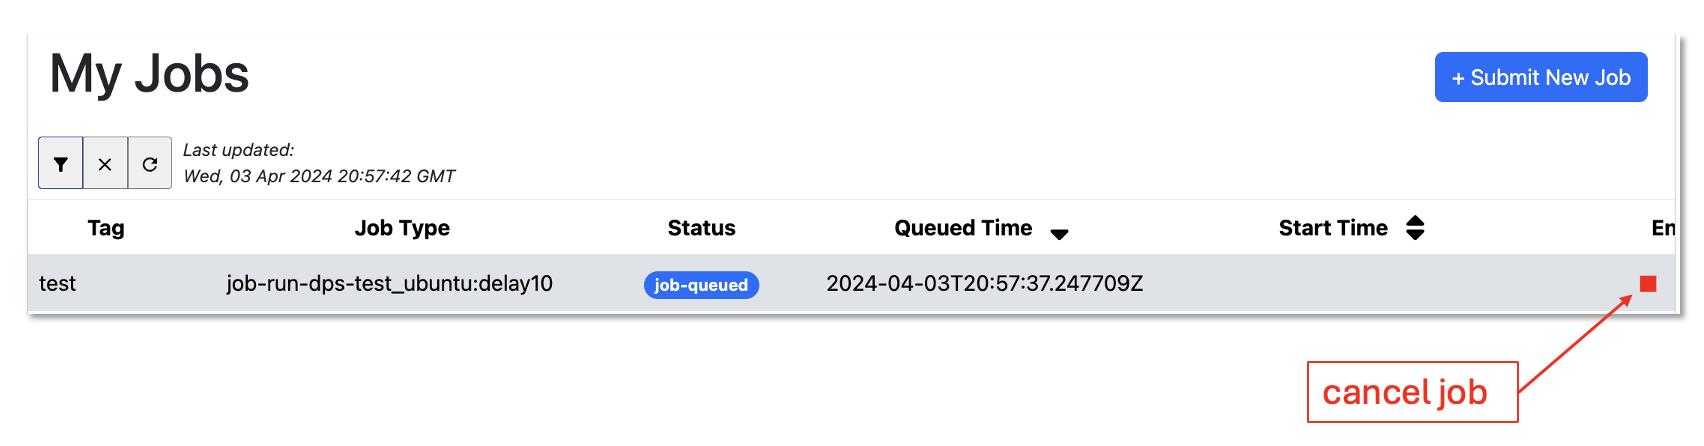
Cancel Jobs
Users may cancel queued or running jobs. Queued jobs that are cancelled will be deleted and no longer listed in the View Jobs table. Running jobs that are cancelled will be stopped, but still viewable in the View Jobs table. These jobs will have the status job-revoked.
Note
Jobs that are listed as queued in the UI, then cancelled, may remain in the View Jobs table after the cancel request was submitted. This is due to a delay within the DPS between job state change and report of job state change. In these cases, the cancelled job was not really queued but had already started.
In the View Jobs table, click on the job you would like to cancel. If applicable (i.e. if the job is queued or running), there will be a “Cancel Jobs” button next to the Job Details header
Click the cancel job button.
Once the cancel request is submitted, a toast will appear in the bottom right of the workspace indicating whether or not the request was successful.
Successful submission: 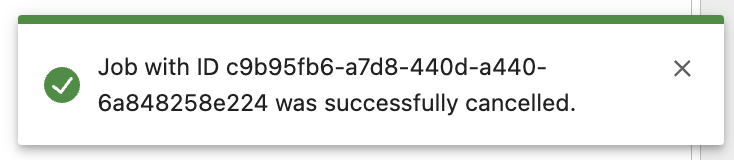
Unsuccessful submission: